When setting up Accelerus, a school will define the cohort types applicable at their school, eg year levels and home groups.
Each of these cohort types must have groups set up for them. For example, if you have defined year level as a cohort type, then the actual year level groups must be set up, eg a record for Year 8, Year 9, etc.
Then, once these groups have been set up, students need to be added to them. However, it is not mandatory to assign students to every or any cohort group.
Cohort groups have a lifespan, as defined for their cohort type in the School Settings window. Therefore, for example, if your school has defined home groups as being annual, you need to have a set of home groups for each year and students are enrolled in their appropriate home groups annually. The same with year levels.
As seen in the 7A home group record here, the home group belongs to the 2011 academic cycle. If you had selected 2010 in the Academic Cycle Selector, the home group with the students for that year would be displayed.

The features of a cohort group's window are described below:
#
|
Feature
|
1
|
Each cohort record opens in its own tabbed window, with the tab and title bar displaying the group's code and name.
|
2
|
The Cohort Details button allows you to hide the group's detail fields, found in the top half of the window, thereby allowing more space for the table of student member names. Reclicking the button will redisplay the fields.
|
3
|
In the fields in the cohort window:
| • | The Academic Cycle is automatically assigned, based on the academic cycle category assigned to the cohort type when it was created in the School Settings window. |
| • | The code and name of the cohort group may be the same as each other, or one may be how it is coded in your school's administration or timetable system and the name may be what is to appear on reports. |
| • | Any role that has been set up for the particular cohort, eg Home Group Teacher, Year Level Coordinator, etc, will appear. In this field, the appropriate teacher is selected and assigned to the cohort group. If more than one role has been defined, eg a second home group teacher, it will appear here also, and the role may be assigned to another teacher. |
|
4
|
The Members table shows the names of all of the students who have been assigned as members of the particular cohort group, with the number of members displayed at the top.
|
5
|
You may click anywhere in a row of the Members table in the Cohort window to select the row. Hold down the Ctrl key or Shift key while clicking rows to select individual or a contiguous set of rows, respectively. Right click to bring up a context menu.
|
6
|
The cohort record's toolbar contains icons that are available where the user has appropriate permissions. These allow, from left to right:
| • | Additional students to be added to the group. |
| • | The details record of students to be opened. Using this, the cohort group's teacher, or others with permission to do so, may view the details of the student, and view or even modify the results of the students in their cohort. |
| • | Students to be moved from one cohort group to another. |
|
7
|
The standard Delete and Reinstate icons found throughout Accelerus allow, in this case, students to be removed from a cohort group or reinstated where they have been marked for removal but the cohort record has not yet been saved.
|

|
Cohort groups are mainly used for administrative purposes, eg to print out reports in home group order, or to be able to print the year level or home group name or home group teacher on the student’s report.
You may not create reports for the actual cohort entities. If you wish to create a report so that the home group teacher or the year level coordinator may assess or write comments about the students in the cohort group, you must set up pseudo subjects for these in order to be able to do so.
|
Some aspects of cohort records in Accelerus to note include:
| • | Cohort records may be added individually manually, or may be imported in bulk using comma-separated value files, ie CSV files. |
| • | When importing cohort records, eg year levels or home groups, you are only importing the details of the cohort groups - the code, name and teachers assigned roles for each cohort group. |
| • | Once cohort groups are set up, students may then be imported, with the CSV file containing with fields for each of their cohort groups. Or they may be manually assigned to their cohort groups. |
| • | Cohort groups are added after teacher records, but before students, as the teachers need to exist in order to assign them to the groups, and the groups must be set up in order to add students to them. |
| • | Each cohort type will have its own Explorer through which the cohort groups may be viewed, opened and deleted, as required. |
| • | The standard icons and methods for deleting records from tables in Accelerus may be used in the Members table of the cohort record, in addition to a process for moving students from one cohort to another being available. |
| • | Where non-perpetual cohort groups are similar each year - the groups and not the student memberships of them - they may be copied from year to year using the Rollover window. |
|
In Accelerus, when cohort roles are set up, teachers in these role may be given permission to view or modify results for the students in their cohort. If this is the case, when logged into the Accelerus database, such teachers, eg a home group teacher, may open their own home groups, view the students therein and possibly view or even modify the results of their home group's students.
There are two windows that allow the viewing of results, one of which allows modification of results also, if you have sufficient permission.
To view or modify the results of their cohort students, cohort teachers would:
| • | Login to the Accelerus database. |
| • | Click the button for the cohort group they wish to open on the Welcome Screen in the section labelled My Cohorts. |
| • | In the cohort window that appears, double click the row of a student whose results you wish to view or modify. |
| • | In the student's record that opens: |
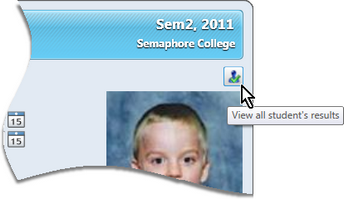
| ➢ | Click the View all student's results icon in the top right corner to view all of the results of the student for the current academic cycles. |
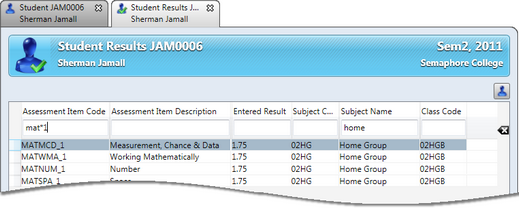
| ➢ | In the results window that opens for the student: |
| ® | Enter search criteria to view only selected results, display additional columns or sort the results by any of the table columns, and other functions found in Explorer type windows. |
| ® | Close the results window by clicking its Close tab icon. |
OR
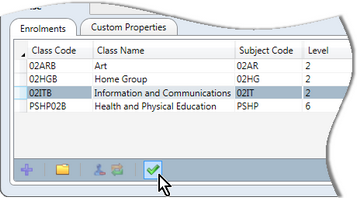
| ➢ | In the Enrolments table of the student's window: |
| ® | Select individual or multiple rows of classes. |
| ® | With the appropriate rows selected: |
| ® | Click the Open single student results icon in the bottom toolbar. |
A separate tabbed window will open for each class selected, appearing very much like single student view available to teachers when assessing the students in their class.
The student's results may be viewed and changed therein, using the standard methods for entering data in this view.
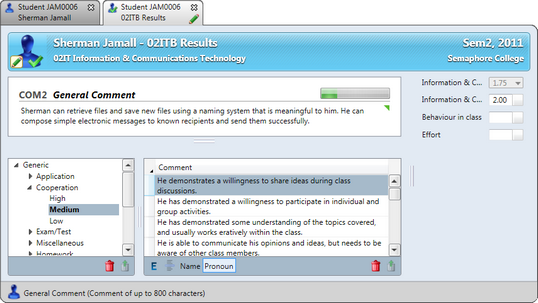
| ® | If changes have been made, save these, |
| ® | Close the student's results window. |
| • | Close the windows of any students you opened to view or modify results. |
| • | Close the cohort window when finished. |
|
Generally, in most schools, students are added to their cohort groupings as part of the importation of student data via CSV files. Schools in the Victorian Government and Catholic sectors may also use XML files for this purpose.
However, you may also manually add students to a cohort group, if necessary, as follows:
| • | Find and open a cohort group through the appropriate cohort Explorer or Quick Find. |
| • | With the particular cohort group record opened: |
| ➢ | Right click over the Members table and select the Add students option. |
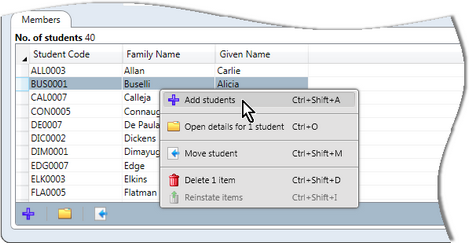
OR
| ➢ | Click the Add students icon in the bottom left corner. |
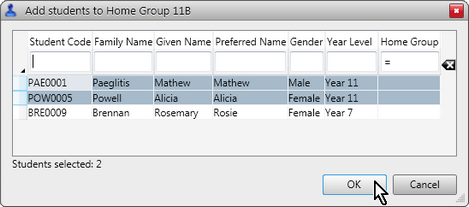
| • | From the Add students window that appears: |
| ➢ | Find the students to be added, using the standard search and selection procedures. |
For example, as shown below, = has been entered in the Home Group field to select all students whose home group is blank.
| ➢ | With the number of students selected being displayed, click the OK button. |
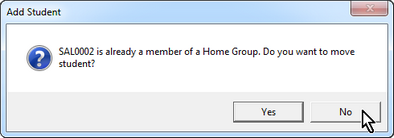
| ➢ | If any of the students being added are already members of a cohort group of the same type, eg another home group, at the message asking whether the students are to be moved or not, click Yes or No, as appropriate. |
| • | Save the additions to the cohort group by clicking the Save icon or pressing Ctrl S. |

|
If you only have one or two students to add to a cohort group, it may be faster to open their student record and enter their cohort group therein. However, the above method is very useful where you have a cohort type where the data is not available to be imported, or a new group has been added.
|
|
Accelerus assumes that students are only members of one group of any cohort type, eg in one home group or one year level. Where necessary, you may move students from one cohort group to another, as follows:
| • | Find and open a cohort group through the appropriate cohort Explorer or Quick Find. |
| • | With the particular cohort group record opened: |
| ➢ | Use the standard procedures to select an individual student or multiple students that you want to move. |
| ➢ | Right click over the Members table and select the Move student option. |
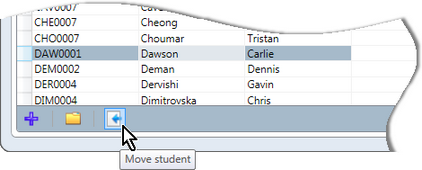
OR
| ➢ | Click the Move student icon in the toolbar at the bottom of the window. |
| • | From the Move students window that appears: |

| • | Save the changes to the cohort group by clicking the Save icon or pressing Ctrl S. |
|