The Source Operator

Accelerus Icon
 

Every analysis begins with a Source operator. It is always positioned as the first step, below the Analysis Properties, and may not be moved.

The Source operator has available to it all data in the database and, from here, you stipulate your initial data requirements for the analysis, ie the type of data required, which particular records, etc.


RA SourceLabels


#

Feature

1

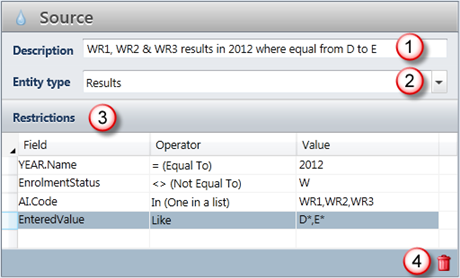
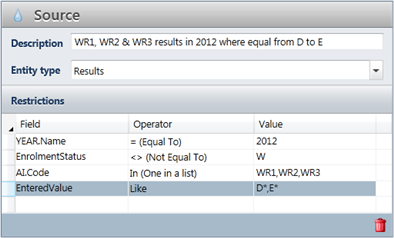
Enter a useful description of the data being extracted via the Source operator, as this is what will appear in the Source operator box in the Steps pane.

2

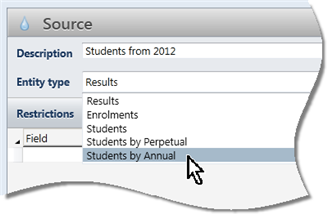
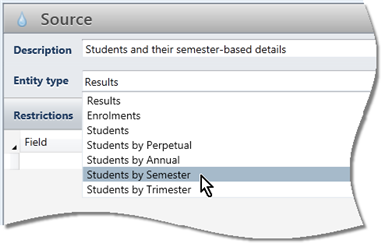
You must select the entity type of the data you require for your analysis. The entity types Results, Enrolments, Students and Students by Perpetual are available in all databases. However, the dropdown list may also contain entity types applicable to your database, based on the academic categories created in the School Settings window. For example, if you have defined a Semester academic cycle category, Students by Semester will appear in the Entity type dropdown list.

It is important to know what data each entity type extracts and to understand the difference between the entities to ensure your analysis extracts the correct data to begin with. The entity you choose will determine the fields available in the Restrictions table and in downstream operators in your analysis.

3

RA RestrictionsTableThe Restrictions table is where you define the data to be extracted.

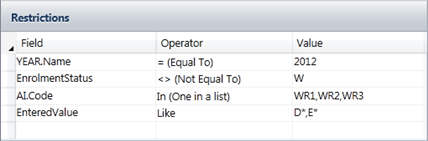
The restrictions table may contain as many restrictions as required. Each row in the table adds a further restriction to the data to be extracted, ie each of the restrictions are joined together by logical AND.

All restrictions must be met for the data to be included in the analysis.

For example, as shown here, four restrictions have been added and each result must meet all four conditions, ie it must belong to 2010, the student must not be withdrawn from the class, the assessment item must have a T1 tag, and the student's year level cohort group must be 9. If any of these restrictions are not met, the result will not be extracted.

4

Rows in the Restrictions table may be deleted by clicking the Delete icon. The rows are removed from the table immediately and, when the analysis is saved, permanently.


minusEntity types

The following entity types are available in the Source operator, each of which has its own set of fields available for selection:

Results
Enrolments
Students by [academic category], eg Students by Perpetual, Students by Annual, etc.
Students

RA Entity types StudentsAnnual

It is imperative you select the correct one of these entity types when setting up your analysis, as this will determine what data you are able to extract, the fields available to use in the restrictions table and in downstream operators and, ultimately, the accuracy of your analysis.

From a simple point of view:

If you want a list of results, you would choose Results as your Source entity.
If you wanted class lists, you would choose Enrolments.
For lists of students in home groups or year levels, you would start with a Students by Annual entity, assuming your home groups are annual and not perpetual.
If you just wanted a list of all students in your database without regard for whether they were enrolled in a class or part of a home group or had obtained certain results, you would base your analysis on a Students by Perpetual or just the Student entity.

In reality, Results is the entity used the most and provides the most information, with less and less data being available as you progress from Results, down to Students.


When using the Results entity, all fields in the database are available to you.

This is because each result is a unique combination of four pieces of information:

The academic cycle
The student code
The class code
The assessment item code

From each of these four fields of data we can ascertain all other data in the database. Because we know:

The student code, we know the student’s name and gender.
The academic cycle, we know the student’s home group and year level at the time.
The class code, in combination with the academic cycle, we know the teacher and what subject it belongs to and, therefore, the subject coordinator and other subject-related information.
Assessment item code, together with the subject and academic cycle, we know the marking scheme of the assessment item, the tags assigned to it, and so forth.

All of this information is available to us, for every single result extracted by the Analyser.

You should imagine each result in the database as being one row in a spreadsheet which has scores of columns for all of the different fields associated with it – the student it belongs to, the academic cycle, the class, subject, teacher, assessment item, marking scheme, etc.

Therefore, if we extract all A results for a particular academic cycle, we will be able to extract and print or export any field at all - from the student's details to the teacher who assigned the A result to the student.


Each enrolment is a unique combination of:

The academic cycle
The student code
The class code.

Therefore there are fewer fields available to us than with results. No information about assessment items and result values is known.


All databases will have a Students by Perpetual entity. This entity type will allow you to extract:

The base student details
Any perpetual custom properties
Any cohort types that have been defined as perpetual, eg House.

NB    Because all other academic cycle categories are children of perpetual, the cohort and student custom properties that belong to all other categories are also available, but they will be returned as arrays.


Your database will have an entity type for each academic cycle category that has been created in the School Settings window, eg Students by Annual, Students by Semester.

In this example below, there is a Students by Annual, Semester and Trimester entity type, for each of the academic cycle categories defined in the particular database.

RA EntityTypesBySemester

With each of these entity types, the following are available:

The base student details
Any student custom properties that pertain to the academic category.
Any cohort types that have been assigned the academic category, eg year level cohorts are usually belong to the Annual academic category and, therefore, may be extracted using Students by Annual.
The custom properties and cohort type data from the parent academic category, eg when Students by Semester is chosen, the annual and perpetual custom properties and cohort types are available in the example above.

NB   In the case of subcategories, or children, of the academic cycle category, although they are available, their data is extracted as an array, and must be treated as such when used in the analysis.

For example, if you select Students by Annual, semester and trimester student data is available, as these are both children of the annual category. However, but there are potentially two data values for semesters, one for each semester, and three for trimesters. The semester and trimester data would be returned in an array, ie a multi-valued list.


This entity only extracts:

The base student details, ie their code, name fields and gender.
The perpetual student custom properties.

Therefore, there is no information about the student’s year level in any point in time or their home group, etc.


minusRestrictions table

RA SourceFieldsThe Restrictions table in the Source operator is where you enter the criteria for the data you want to extract.

It is very unlikely we want every single result, enrolment or student in the database. We are more likely to want results in a particular assessment item, for particular students, in particular subjects, in particular cycles or years, and so on.

For each restriction to the data, we add a row to the table, with each restriction having a field, an operator and a value.

In order for a row of data to be extracted, it must meet the conditions of every restriction row.


Warning

You do not add a restriction just because you want to include a field in a print out. For example, we may want to extract all of the unsatisfactory results for students so that we can compare males with females. We do not need to restrict on the basis of gender; there is no need to enter anything about gender in the restrictions table. You will get the gender of the student to whom each result belongs automatically. You would only enter a restriction based on gender if you just wanted males or just females.

Therefore, in the restrictions table shown here, all students who received a D or E in the items WR1, WR2 and WR3 are extracted. In the Print operator we could, optionally, separate the output into males and females.

Remember, you only enter restrictions for where you do not want all possible values for a particular field and you haven't already added a restriction that excludes a particular value by virtue of another of its properties. For example, if you enter a restriction that only extracts results where AI.Code = ABSENCES, it is not then necessary to add a restriction that extracts only numeric items such as MarkSchemeCategory = N.

Otherwise, every field will come with each result, or the type of entity chosen.


minusRestriction fields

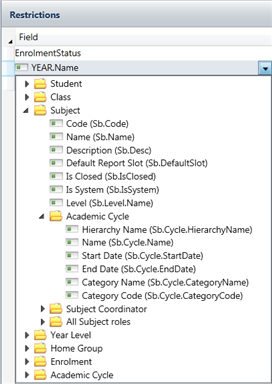
When you click in the Field cell and click on the dropdown arrow in the cell, a list of the available fields appears, from which you select the field you require for each restriction row.RA FieldNamingProtocol

All of the fields are grouped into folders for ease of retrieval, eg Student, Subject, Assessment Item, etc, but the available fields in the Restrictions table will depend on the entity type that has been chosen.

The list of available fields will be found throughout the Analyser, with most of the fields therein being quite straightforward, eg fields for the student's code, given name, gender, etc. Others have specific meanings and usage, and are covered in detail in the section Available Fields.


minusRestriction operators

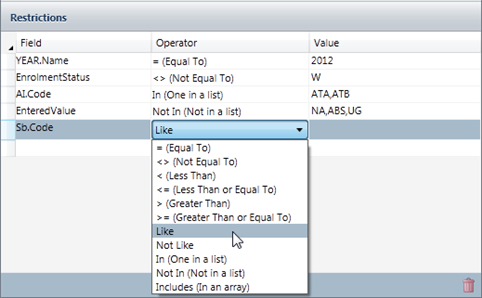
The middle column in the Restrictions table is where you select from a list of operators, eg Equal to, In, Like, etc.

RA SourceOperators

Most of the operators will be familiar, but others may be less so. However, all of the operators must be used correctly, even those that seem straightforward, and several have very specific requirements.

The requirements and factors you must take into account for each operator are covered below.


Equal To (=) and Not Equal To (<>) require exact matches.

Take the following restriction example:

AI.Code  =  Item1,Item2

It is likely that no data will be extracted, if used, as the assessment item code must literally equal all of "Item1,Item2" and it unlikely you would have an assessment item in the database coded in this way. If what you are wanting is an assessment item equal to Item1 or one that is equal to Item2, you must use an In operator, not Equal To.


When using the four greater and less than operators (>, >=, <, <=) with numeric values, their usage is logical, eg EnteredValue  >=  65.

However, most of the data in your Accelerus database is not numeric, but text or strings. Using the Greater and Less Than operators with text is not straightforward, as string and not numeric comparisons are being made. For example, to extract results that use an A to E marking scheme, where the students attained a B result or better, entering

EnteredValue  >=  B

will extract C, D and E results and not A and Bs, because they are greater in an alphanumeric sort than B.

In this case, you would need to enter:

EnteredValue  <=  B

On the other hand, if the results are graded A+, A, A-, B+, B, B-, etc, neither <= nor >= will produce the exact results required. This is because the alphabetical sort order is A, A+, A-, B, B+, B-, etc.  B+ and B- are both greater than B!

Therefore, in such cases, you should consider either using the ResultOrdinal field for the restriction or an In operator, this latter option being the recommendation, eg:

EnteredValue  In  A+,A,B+,B


The Like operator allows selection to be restricted to those values which contain the specified text in the Value field. For example, you might want to select all assessment item codes which begin with WR, or have WR within them.

Not Like is the opposite to Like, whereby selection is to be restricted to those elements which do not have the specified text within them, eg all assessment items which do not begin with WR.

If you use the Like or Not Like operators, you must add at least one wildcard character in the appropriate place. For example:

St.Code  Like  BAR*
Sb.Code  Like  ??MA*
AI.Code  Not Like  WR*,AT*


Use the In operator when you want to match one of a set of values. The converse of In is Not In, which allows you to match all but the listed values.

When using In or Not In, the list of values must be separated by commas, without spaces. For example, you may want to restrict your analysis to three subjects, say 07ENG, 08MAT and 07SCI, which would be inserted as:

Sb.Code  In  07ENG,08MAT,07SCI

Therefore, the In operator can be thought of as using a combination of equals and logical OR, ie the subject code is equal to 07ENG or is equal to 08MAT or is equal to 07SCI.

NB    You may not use wildcard characters with In / Not In.


RA RestrictionsArray1
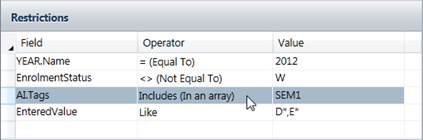
The Includes operator is only used with arrays of values, ie in conjunction with the following available fields which are all multi-valued fields:

The AI.Tags field
All of the array fields found under the All Roles sections for cohorts, subjects and classes, eg Cl.Roles.Code.

For example, you may want to restrict the data to only assessment items that include the tag SEM1. As assessment items may have multiple tags, these are an array of values, eg [T1,SEM1].

If the assessment item’s tags array includes SEM1, the data is to be included.


The AI.Tags and AI.Tags.Comma fields and the various All Roles available fields are all multi-valued fields. Therefore, they must be dealt with in a different manner to single-valued fields.

You cannot use the same operators as you would with single value fields. For example, you cannot use In and Not In with these.

Instead, in the array fields, you should use the Includes operator, eg:

AI.Tags  Includes  Sem1

In the case of the comma separated value fields, eg AI.Tags.Comma, you would use Like or Not Like, eg:

AI.Tags.Comma  Like  *SEM1*

Note that when performing calculations on any of the array fields, you may use the various functions that work on a list, eg to extract the first or last value of an array, as found in the Calculation Editor.


minusRestriction values

RA SourceCommasIn the Value column of the Restrictions table, you enter the values of the data that you want to extract. This requires you to know your database, its structure, academic cycles, type of data, coding systems, etc, and to enter your value requirements correctly.

Note the following:

The data entered does not have to be case specific.
The data in the Value column is treated as a string, ie text, automatically, and, therefore, it is not necessary to put quotation marks around the values in the Source operator.
With most of the operators, you may only enter one value per row. However, the In/Not In and Like/Not Like operators allow a series of values to be entered, separated by commas, as shown here.
Equal To and Not Equal To require exact matches.


When you use the Like or Not Like operators, you must enter wildcard characters in the appropriate place. The following wildcard characters are available:


?

Used to signify any single character, eg AI.Code  Like  Final? will find assessment item codes that have one character after the word Final.

*

Used in place of any number of characters, eg Sb.Code  Like  07* would be entered to extract all subject codes that begin with 07, with any number of characters following.

[ ]

Square brackets may be placed around a series of characters, whereby any one character within the brackets must be matched. For example:

AI.Code  Like  AT[123]

would select the assessment item codes AT1, AT2 and AT3.

You may also use the above wildcard characters in comma separated lists of values when Like and Not Like are being used. For example, to extract all subject codes that begin with ENG or MAT, you could enter:

Sb.Code  Like  ENG*,MAT*


RA ParameterSourceEg1
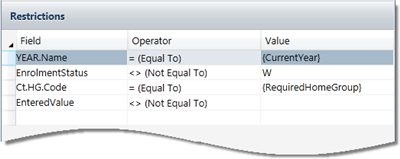
In any analysis that will be run regularly, instead of entering string values in the Value field, parameters may be used.

For example, if you produce listing of all results for each year, each term and/or semester, instead of entering the actual academic cycles required, parameters would be inserted. In this way, the report can be run every cycle, you are prompted to enter the cycle required, and you do not need to change the analysis every cycle.

In the example shown here, parameters called {CurrentYear} and {RequiredHomeGroup} have been inserted in the Value field and these will be replaced with text values when the analysis is run, with the person who runs the analysis, entering or selecting the required replacement values.

All of the details on setting up and using parameters in analysis can be found by clicking here.


RA SourceNEBlankThe Accelerus database reserves a space for every potential result, ie where a student is enrolled in a class, for every assessment item of the subject to which the class belongs to. Therefore Accelerus analyses blank and non-blank results.

Unless your analysis specifically extracts results that meet particular criteria, eg the result value equals A or is one of a specified list, your output will include blank results.

To specifically exclude blank results from your analysis, in the Source operator, where there is no restriction of the results to particular values, you need to add a restriction to ensure that extracted results are not equal to blank, ie no text is entered in the value cell of the restriction, as shown here.

The beneficial side of this is that you may set up and run analyses to find the blank results in any assessment items in your database, ie find results where the EnteredValue is equal to blank.


Magnifier

The Analysis window

The Analysis Explorer

Importing and Exporting analyses

Creating an analysis

Copying analyses and operators

Setting up parameters in analyses

The Print operator

The Export operator

Outputting data

Advanced operators

The Calculation Editor