Analysis Properties and Parameters

Accelerus Icon
 

Every analysis has an Analysis Properties section, at the top of the Steps pane on the left side of the Analysis window.

RA ParametersProperties

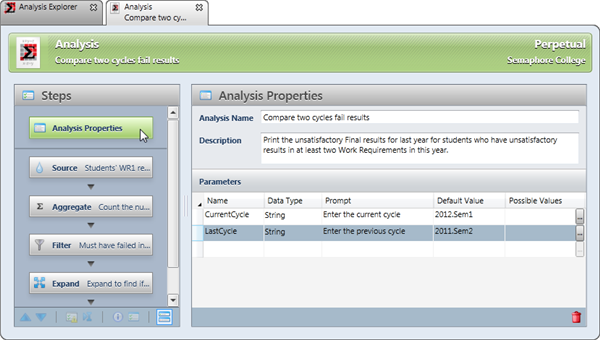
On clicking this, the Analysis Properties pane is displayed, within which you:

Assign a name to an analysis, which may not be the same as the name of an already existing analysis.

This may be up to 40 characters in length.

Enter a description of the analysis.

This is a longer, more detailed description of the analysis, detailed enough to identify its contents and usage from the Analysis Explorer, especially where there are several similar analyses.

Optionally, set up parameters that apply to the analysis.


minusUnderstanding parameters

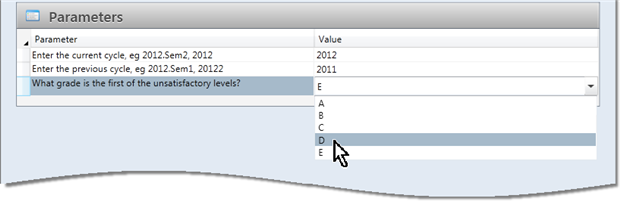
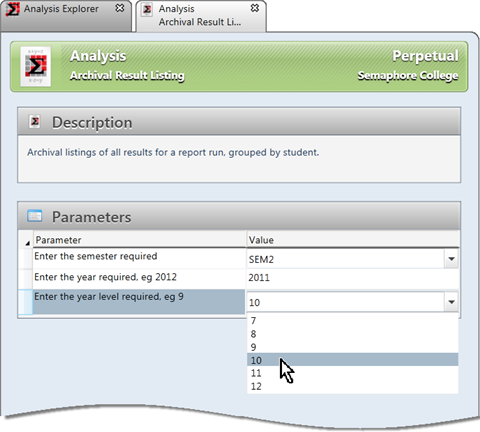
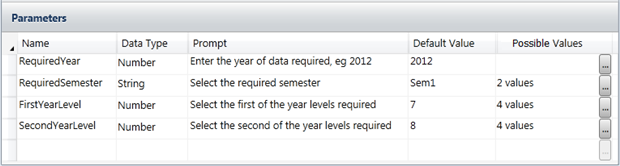
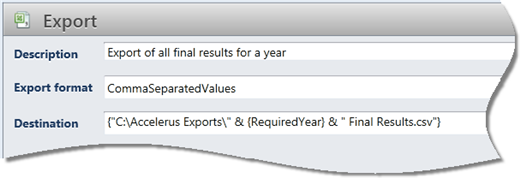
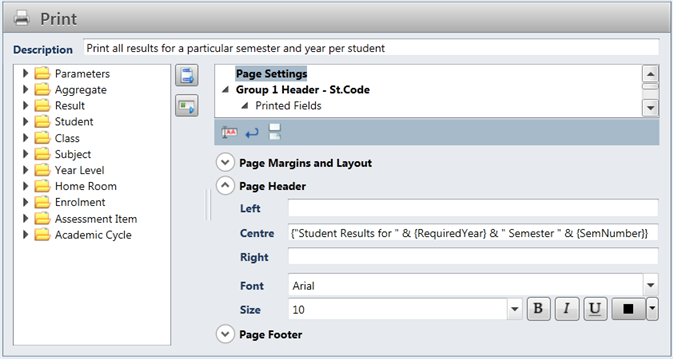
Parameters are placeholders so that, when the analysis is run, the user may specify the values that are to be inserted in place of the parameters. Parameters allow an analysis to be run again and again without having to open and modify it when some elements change. For example, a CurrentYear parameter may be inserted so that the same analysis can be run for every different year, without having to change the analysis every year.

You may add multiple parameters in the one analysis. For example, you may have an archival analysis that you run every semester for every year level, with all results printed compactly for each student. Instead of having to change the academic cycles, year level and/or tags of the analysis to extract the correct data each report run, placeholders are inserted in the analysis where the data varies.

When the analysis is run from the Analysis Explorer, the user is prompted to enter values for the parameters found in the analysis.

As shown below, where an analysis is being run, the user is being prompted for three different parameter values: the semester and year of the data, and the year level of the students. The user enters or selects the required values. These values replace the parameter fields in the analysis so that the analysis output reflects the values entered.


RA ParametersPrompt

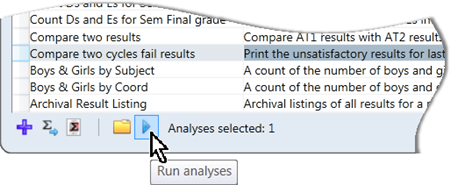
In order for a user to be able to run analyses, they must be logged directly into the Accelerus database and have been assigned to a school role, in the Security window, that has Run Analyses permission.


minusSetting up parameters

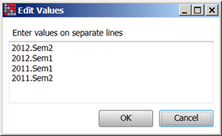
Parameters are set up in the Analysis Properties section of an analysis. They may be set up from scratch or parameters may be copied from another analysis.

Each parameter is one row of the Parameters table of this pane, as shown here.

RA ParametersTable

Each parameter is made up of the following five fields.


Field

Usage

Name

This is the name that identifies the parameter. It is how the parameter will be referred to throughout the analysis, where it is entered in place of a changing value. For example, the names RequiredYear, RequiredSemester, etc, used above.

Try to select names that are descriptive and will not get confused with other fields used throughout Accelerus. Also, it is highly recommended that you do not use spaces or any special characters in parameter names.

Data Type

This specifies the type of data that may be entered for the value of the parameter when the analysis is run, being one of the following:

String, ie any free-form text, with this being the most commonly used data type as it can encompass any type of data.
Number, allowing numeric values only, including decimals.
Date, using any valid date format, eg 15/03/1956.
File, ie a valid file name path, eg C:\Accelerus\Export.

Prompt

This is the prompt the user will see when they run the analysis, informing them of what is required to be entered, eg Select the required semester; What year level is required?; Enter the maximum value, and so forth.

Default Value

When an analysis with parameters is opened and run in its own analysis window and not the Analysis Explorer, the default value entered here will be used.

The default value will also be the value that will appear by default in the value field, and also gives the person running the analysis from the Explorer an indication of the sort of data that is expected, eg Sem1, as shown above.

Possible Values

This is optional but it is recommended that a list of the acceptable values is entered, especially if the type of the data expected is unfamiliar to teachers or must match exactly, eg 2011.Sem1.RA ParametersEditValues

On clicking the browse button at the end of the Possible Values cell, an Edit Values box is displayed.

In this, a list of the acceptable values is entered, one per line.

Where possible values have been entered, those running the analysis will only be able to select a value from a dropdown list which contains the values entered in the Edit Values box.

Note that, where possible values have been added, the default value must be one of the possible values. Also, the case of the default value must match that found in the possible values list.


minusUsing parameters in the analysis

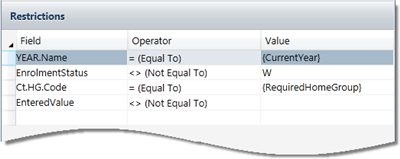
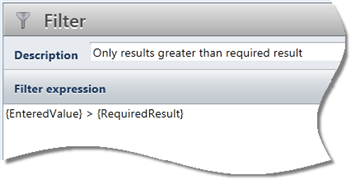
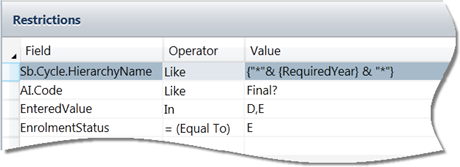
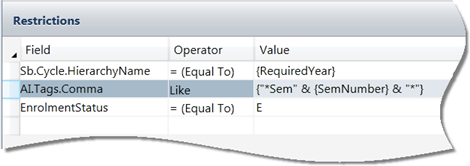
Parameters may be entered throughout your analysis, in any operator, as a placeholder. For example, you may have an analysis that is run each year, counting the number of As to Es for each semester. By including a parameter for the semester number, eg SemNumber, you could use the parameter in:

The Source operator, to signify the cycle of the results to be extracted, or the suffix of assessment items holding the results.
The calculations in the Aggregate operator that count the number of As, Bs, etc, for the semester.
An Export operator, to export the data to a file that includes the semester number in its file name.
In a Print operator, for the heading, so that it identifies the contents of the print out, and so on.

There are protocols or rules regarding the use of parameters, and you must follow these exactly in order to obtain the correct results from your analysis, as covered below.


There are two rules that should be applied when referencing parameters in analyses.

Rule 1: Braces around parameters

The first rule in relation to the use of parameters is that if the parameter is being used in any location where a string would normally be used, it must be enclosed in braces, eg {CurrentYear}.

Rule 2: Braces around expressions

If you want to use a parameter in an expression in any place where a formula would not normally be expected, the parameter itself and the whole of the expression must also be enclosed in braces.

This would normally be the case in:

The Source operator and Expand operators’ Restriction tables
The Print operator’s report header or footer fields
The Export operator’s file destination field.

In all other places, ie in formulae used in the Filter, Formula and Aggregate operators, these already work with expressions and, therefore, you do not need to enclose the whole express in braces. Simply, place the parameter, with its own braces, in the position you would enter the string.


In a Source operator, where you are using the parameter as a straight substitute for a value, you simply insert the parameter, with its braces.

In the example shown here, two parameters have been entered, directly as substitutes for what would normally be values.

RA ParameterSourceEg1


In a calculation, a parameter can be entered in the place of a value.

Because the Filter, Formula and Aggregate operators operators are already working with and expecting expressions, you simply need to replace the value with the parameter.

In this example, in a Filter operator, we have a simple expression whereby results are only selected if they are greater than a particular value, eg {EnteredValue} > 50. The value is simply replaced by the parameter which, as shown here, is {RequiredResult}.

RA ParameterFilterEg


Even with more complex calculations the same rule applies, whereby you need only replace the value that would normally have been in the expression with the parameter.

For example, we may want to count the number of A results of a student in each semester of a year.

In the Aggregate operator, we could use a DCountIf function which may look like this:

DCountIf(1, {EnteredValue} = “A” AND {AI.Tags.Comma} Like “*Sem1*”)

If we have a parameter for the semester number for which users can substitute 1 or 2, all that is required in our formula is the replacement of the 1 in Sem1 with the parameter and concatenating the other parts of the expression to it, as shown here.

RA ParameterAggregateEg


We may want to select particular results belonging to all of the cycles that are associated with a particular year, eg 2012, 2012.Sem1, 2012.Sem2, 2012.Sem1.Term1, etc.

Without using parameters, in this case we could enter a restriction in the Source operator such as:

Sb.Cycle.HierarchyName  Like  *2012*

This, in the Source operator, is no longer a straight substitution but requires the creation of an expression, ie we must concatenate the asterisks at each end of the year to the parameter. Therefore, the asterisks must be enclosed in quotation marks, and we must use the Concatenate operator (&) to join the three strings together in the one expression. Because we have now substituted an expression for what would have been a value in the Source operator, which does not expect expressions, the whole expression must be enclosed within braces.

The example here shows the requirements for the Value field in this case.

RA ParameterSourceEg2


In this Source operator example, assessment items are being selected where they are tagged Sem1. We have created a parameter named SemNumber that will store just the semester number, ie 1 or 2.

Because assessment items may be tagged with multiple tags, and the exact position of the Sem1 tag in the list may vary, eg T1,Sem1 or Sem1,T1, if using the field AI.Tags.Comma, we would normally enter:

AI.Tags.Comma  Like  *Sem1*

Replacing the Value field with parameters, our restriction would appear as shown below.

RA ParameterSourceEg3


The string value *Sem that precedes the semester number must be contained within quotation marks, as must the asterisk at the end of the expression.

The {SemNumber} parameter is concatenated (&) in the middle of these two strings, and the whole expression is surrounded by braces.


We may have a RequiredYear parameter in our analysis, eg to extract final result data for any year nominated by the person running the analysis. We can also use this parameter in an Export operator as part of the output file path, so that the name of the file reflects the year of the data being exported.

If we were running the analysis without parameters, in the Destination field we might enter:

C:\Accelerus Exports\2012 Final Results.csv

Instead, using parameters, the Destination would be set up as shown here.

RA ParameterExportEg


All text directly before the year field would be surrounded by quotation marks, as would the text following it, including the file type extension, eg .csv. The parameter field {RequiredYear} would be concatenated (&) on each side to these two strings. Braces surround the whole expression.


If we were printing out a listing of all results for a particular semester and year, we may want the print out to reflect the semester and year that was entered via parameters, in the Print operator’s Page Settings section.

If we were just typing in the Page Header text, it might be:

Student Results for 2012 Semester 2.

Replacing 2012 with a parameter and the 2 with a parameter for the semester number, the header text would need to appear as shown below.

RA ParameterPrintEg


minusRunning analyses with parameters

When an analysis contains parameters:

If it is run from the Analysis Explorer, the user will be prompted to enter or select values for the parameters in the analysis.
Where it is opened and run from its own tabbed window, the default values set up in the parameters will be used, without prompting.

The first option means, therefore, users do not need to know how to create and set up analyses in order to run them, and can be assigned run-only permission.


Steps

The following are the steps to be followed by any user running an analysis that contains parameters which need to be substituted for particular values:

Go to the Explore menu and select Analyses.
Find the analysis to be run, using the standard Explorer procedures to find it.
With the required analysis highlighted, click the Run icon at the bottom of the Explorer.

RA ParametersRunIcon

In the Analysis run window that appears, for each of the parameters listed there, accept the default value that appears, enter the required value, or select one of the possible values from the dropdown list.

RA ParametersRun

Click the Run button below the parameter table and wait while the analysis executes.