Student Management

Accelerus Icon
 

Students records remain in the Accelerus database perpetually. There is only one base record per student for all the years of the database that stores data such as their code, name and gender. However, cyclically, there is other student data that changes: their enrolments, their year levels, home groups, etc. Together, this is what you see in a student's window when you open it.

If you open a student's record in one academic cycle it will reflect the enrolments and cohort memberships applicable at that time, and a different set at another time.

Students are identified by their student code which, usually, will not change over the life of the Accelerus database. It is recommended that the same student code is used as the one assigned in the school's administration program. As it is usual for student data to be imported into Accelerus from other databases at the school, keeping codes consistent will aid data transfer, as well as allow photos to be imported more easily.

Adding students to Accelerus, and deleting those added in error, is a role that may only be undertaken by those who have a school role and have the permission Administer Students activated.


Ent StudentWindowNumbers


The general features of a student's window to become familiar with are covered below.


#

Feature

1

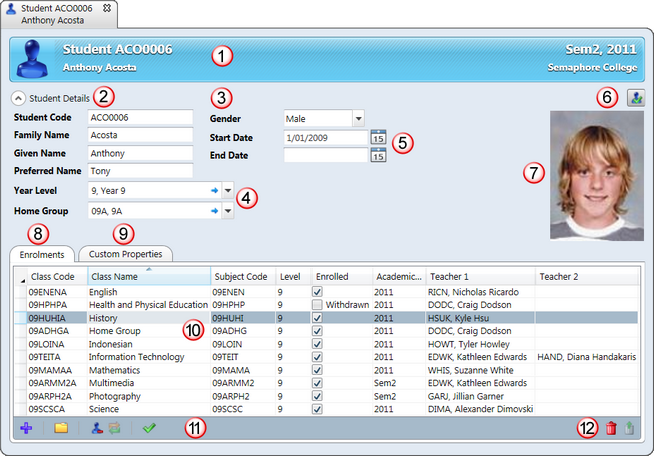
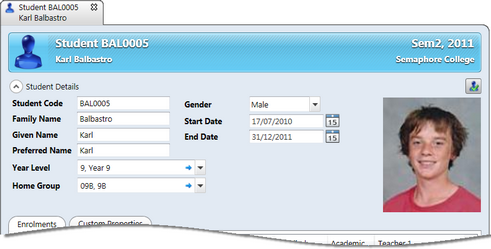
Each student record opens in its own tabbed window, with the tab and title bar displaying the student's code and name. These details will appear whenever you open a particular student's record, but the academic cycles, shown in the right corner of the title bar, inform you of the timespan to which the enrolments and cohort group memberships in the window belong.

2

The Student Details button allows you to hide the student detail fields, found in the top half of the window, thereby allowing more space for the various tables below. Reclicking the button will redisplay the fields.

3

In the fields in the student window, the following is the base data associated with a student:

Student Code is a mandatory field, usually assigned by your school's administration system.
The student's family, given and preferred names are mandatory. In most cases, the given and preferred name are the same, especially where it is a school's policy that students are always referred to by their given name.
The student's gender is mandatory and may be selected from the dropdown list.

4

Cohort group fields will appear for each of the cohort types the school has defined in the School Settings window. Most often, as shown above, there will be a Year Level and a Home Group cohort, however called at your school. The cohorts to which the student belongs will change according to the academic cycle category assigned to them by the school, eg if annual, every year.

Students may be added manually to their cohort groups by selecting the group from each cohort field's dropdown list.

5

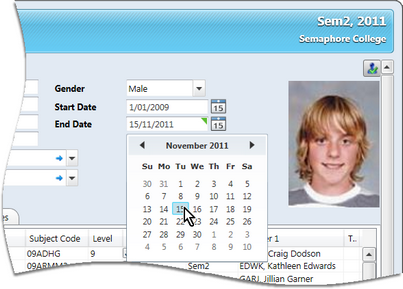
Students may be assigned a start date, ie the date at which they commenced at the school. Also, an end date may be added when they leave the school.

These dates may be entered in any valid date format or selected by clicking the calendar icon. They are used in determining whether a student is considered current or not and whether they appear in the Student Explorer or Quick Find by default. However, these date fields may remain blank.

6

The icon in the top right of the student's record takes you to a Student Results window. All of the results of the student, for the cycles listed in the window's title bar, may be viewed and filtered therein.

7

Student photos, if imported into Accelerus, are seen here and in the class and subject results windows by teachers as they assess their students.

8

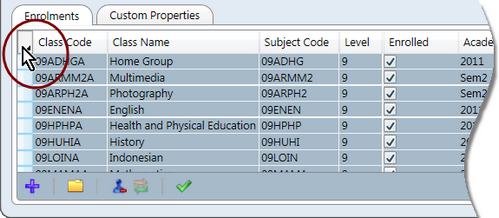
The Enrolments tab displays all of the classes of the student for the currently selected academic cycles.

9

Schools may define their own student custom properties to store information about students that they would find useful in assessing and reporting on students, eg ESL status.

Custom properties are defined in the School Settings window, and students are assigned their custom property values in this tab of the student window.
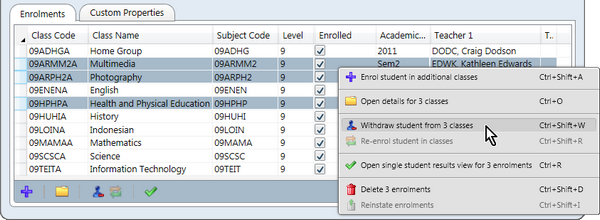
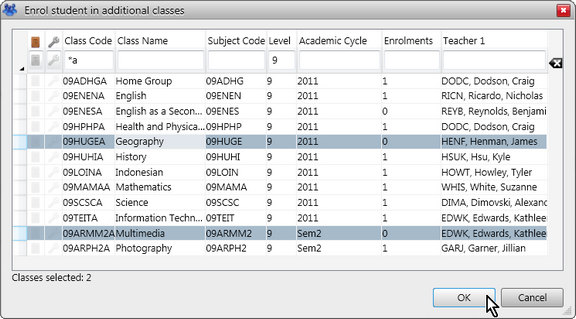
10

Standard multiple selection procedures may be used to select class rows in the Enrolments table. Click anywhere in a row to select it. Hold down the Ctrl key or Shift key while clicking rows to select individual or a contiguous set of rows, respectively. Right click to bring up a context menu with the available enrolment options.

11

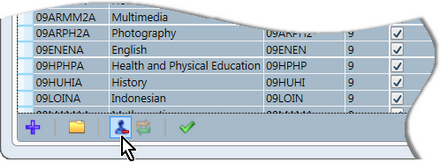
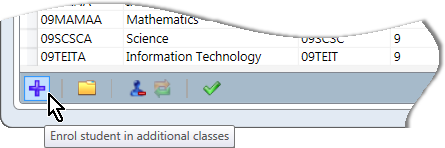
The Enrolment tab's toolbar contains icons that allow the following functions to be performed:

Additional classes to be added to the student.
The details of the classes in which the student is enrolled to be opened.
The withdrawal and re-enrolment of students from classes.
To bring up single student results view for the selected classes.

Ent StudentEnrolmentIcons

12

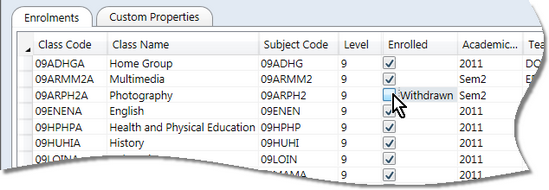
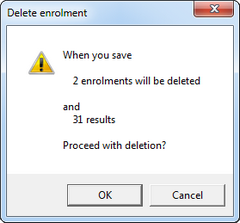
The standard Delete and Reinstate icons found throughout Accelerus allow, in this case, classes to be removed from the student, or reinstated where they have been marked for deletion but the student record has not yet been saved. In most cases, students are not deleted from classes, unless unless they were originally added in error, but are usually withdrawn from them.


minusWorking on student records

Some aspects of student records in Accelerus to note include:

Generally student data is imported into Accelerus using CSV files from other databases at the school. However, manual procedures are also available to add new students when they arrive mid-cycle, or to make individual changes as required.


VELS

Victorian Government and Catholic schools should be importing students, up to and including Year 10, using an XML file that has come from the school's administrative system. CSV files may need to be used for Year 11 and 12 students, however.


When students are being added manually, it is important to remember to also add data to the custom property fields that have been set up at the school, as appearing in the Custom Properties tab in the student window.
Student records are amongst the last that need to be set up in Accelerus. Teachers and cohort groups must precede them and, strictly speaking, they do not need to be added until after subjects and classes have been completed.
Several enrolment maintenance tasks are available via the student window, including the enrolment of the student into classes, their withdrawal from classes when they leave mid-cycle, and reinstatement into classes from which they were previously withdrawn. Even more are available through a class window, including moving students from one class to another.
The Student Explorer is used to view and open student records and, if appropriate, delete them if added in error.
Students are not deleted when they leave the school. Instead, they are made inactive by assigning them an end date.


minusCurrent and non-current students

Student records apply across the database perpetually and you do not delete them when they leave the school. Usually, however, one does not want students who have left to keep appearing in windows and listings. Therefore, students are considered current or not current, and only those who are current are displayed in the various Accelerus windows and processes.


Every student record contains start and end date fields which determine when a student is current or not.

A student is not current in the academic cycles selected if:

The student's start date falls after the academic cycle end dates.
The academic cycle starts after the student's end date.

For example, the student below, with an end date of 31 December 2011, is current in Sem2, 2011, but will not be current when the 2012 academic cycle starting on 1 January 2012 is being viewed. He would also be non-current if viewing cycles in 2009.

Note, however, that he would appear if we went back to Sem1 2010, because when we are viewing semester 1, the 2010 cycle is still in force, and this is still applicable to him.

Ent StudentStartEndDates

A student who is not current does not appear in Quick Find, the Student Explorer and various student listings, for the currently selected cycles.

It is not mandatory to enter start and end dates. However, if an end date is not entered for a student, when they leave, even though they may not have been enrolled in any classes or assigned a year level, they will still appear in the various windows and listings, as their base data is perpetual.


Although students who are not current do not appear, by default, in the Student Explorer or Quick Find, there may be times when you need to bring up a non-current student. For example:

A student who has left the school may return and their end date will need to be removed in order to reactivate them.
The code of a student who has left has been reused by your school's administration system. Therefore, the old student record needs to be opened and the code changed so that it is then available to be assigned to the new student in Accelerus.

In order to redisplay non current students:

Go to Tools > School Settings.
Click the System Items tab.
In the System Defaults section, tick the Show non current students and teachers checkbox.

Ent TeacherShowNonCurrentSetting

Save the School Settings window.
Open the Student Explorer and find the non current student's record.
Open the record and make the changes required, eg delete the end date or change the student's code.
Go back to the School Settings window and deselect the Show non current students and teachers checkbox.


minusStudent enrolment functions

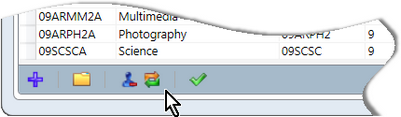
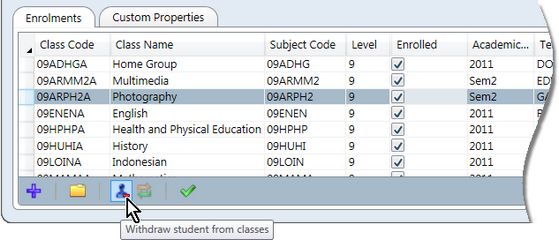
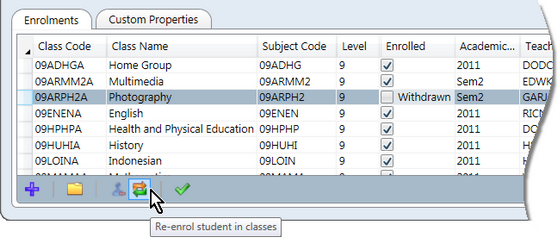
Icons along the bottom of the student window allow you to perform various enrolment functions for the displayed student, if you have sufficient privileges. A right click context menu is also available.

The standard procedures are available to select multiple rows and then perform the necessary enrolment operation on these simultaneously. The context menu will display the number of the enrolments selected.

Ent StudentContextMenu


It is important that the differences between the enrolment functions are understood and that they are used correctly as they have a different effect on enrolments and the extent of data deletion.


Generally, students are enrolled in their classes in bulk, either via CSV files or using the Bulk Enrolment window. However, there are times when enrolments may need to be added manually, such as when a new student comes to the school mid-cycle. In these cases, it may be easier to simply add the new student and then enrol the student in his or her classes manually.


Lightbulb

When you have multiple students to enrol into the same class, it is more efficient to add these via the Class window.

Also, this window allows you to move students between classes of the same subject, taking their results with them, as well as copying a set of enrolments from one class to others.


To add enrolments to the currently displayed student:

Right click over the Enrolments table and select Enrol student in additional classes.

OR

Click the Enrol icon in the toolbar.

Ent StudentEnrolIcon

In the Enrol student in additional classes window, you may use the standard selection window procedures:
Enter search criteria to find the classes you require, including using wildcards
Customise columns, eg change their order, hide or display particular columns.
Sort the records in the table.
Use multiple selection procedures to select the classes rows required, or all classes that match the selection criteria.

Ent StudentEnrolSelection

If you have selected classes in which the student is already enrolled, a message will appear and you will not be able to add them twice.

Click the OK button and the selected classes will be added to the student's table of enrolments.
Click the Save icon or press Ctrl S.


Unless enrolments for a student has been added in error, they should never be deleted. Instead, students should be withdrawn from classes.

This means that:

A historical record of their enrolment, and the results for it, remain in the database.
Students are removed from any class or subject results windows of their withdrawn classes.
When teachers are using offline files, these students are removed from the classes and the teacher is informed of the withdrawal when they synchronise.
While a student is withdrawn from a class no results for the student may be modified, not even by the Accelerus administrator.


Lightbulb

When you have multiple students to withdraw from the same class, it is more efficient to do so via the Class window.

Also, often, rather than withdrawing a student from one class and enrolling them in another, they need to be moved between classes of the same subject, taking their results with them. This, and other, procedures are also available from the Class window.


You may use different methods to withdraw a student from classes:

Click the checkbox in the Enrolled column and Withdrawn will appear.

Ent StudentEnrolCheckbox

OR

Highlight a row or use the standard methods to select multiple class rows:
Right click over the Enrolments table and select the Withdraw option.

OR

Click the Withdraw student from classes icon in the toolbar.

Ent StudentEnrolWithdrawIcon

Click the Save icon or press Ctrl S.


Where students have been withdrawn from classes, they may be re-enrolled. This will result in their reappearance in the classes, together with any results that may have been entered for them prior to being withdrawn.

Where teachers are working in offline files, the teacher of the class will be informed when they synchronise their offline file of the student's re-enrolment.

To re-enrol a student from classes from which they have been withdrawn:

Click the checkbox in the Enrolled column where Withdrawn is displayed to tick the box.

Ent StudentEnrolCheckbox

OR

Highlight a withdrawn class or use the standard methods to select multiple withdrawn rows:
Right click over the Enrolments table and select the Re-enrol option.

OR

Click the Re-enrol student in classes icon in the toolbar.

Ent StudentEnrolReenrol

Click the Save icon or press Ctrl S.


As with most Accelerus windows that include tables of data, rows may be deleted using the Delete icon in the bottom right corner of the student window. This icon allows enrolments to be removed from a student totally.

However, enrolments should not be deleted once results are already recorded for the student in the database, or have potentially been recorded by teachers in their offline files.

Students should be withdraw from such enrolments instead. Only remove enrolments from students that have been added in error.

If you do select enrolments and click the Delete enrolments icon, a message will appear, informing you of the extent of the deletions, ie how many enrolments and results will be deleted.

Ent StudentEnrolDeleteMsg

If you click OK, the enrolment rows will be marked for deletion with a red line. They will be permanently deleted on saving the student record, or you may reinstate them by clicking the Reinstate enrolment icon.


Warning

If teachers are using offline files, there is always the possibility that results have been entered for a student in the offline file and not synchronised back to the database, at the same time as the student's enrolment has been removed from the database. If this is the case, when a teacher sychronises their offline files, the student will be removed from their class and all the results deleted from therein. However, any results that have been added since the teacher last synchronised will be added to the Result Conflicts table in the Accelerus database. They may be viewed in the Result Conflict Explorer, from where they may be retrieved, if necessary.

The results that were already in the database, of which the Accelerus administrator was informed in a message such as the one above, are not found in the Result Conflict Explorer. These may be retrieved from the automatic backup copies of the offline files on the teacher's computer.


minusWhen a student leaves

Students should never be deleted from the Accelerus database unless added in error. Instead, when they leave the school, you should make them inactive and follow the procedures below, depending on whether they leave mid cycle or at the end of the year, as in the case of Year 12 students.


When a student leaves the school in the middle of a cycle, eg year or semester:

Use Quick Find or the Student Explorer to find and open the particular student's record.
In the End date field, enter the end date for the student in any valid date format or select the date by clicking the calendar icon.

Ent StudentEnrolEndDate

In the Enrolments table, click the top left cell of the table or press Ctrl A to select all of the classes.

Ent StudentEnrolSelectAll

Click the Withdraw student from classes icon in the toolbar.

Ent StudentEnrolWithdrawAll

Click the Save icon or press Ctrl S.


When students leave at the end of the school year such as when the students in the last year level at the school leave, you need only insert an end date in their student record. They do not need to be withdrawn from classes as they were legitimately in the classes for their duration.

Students may be end dated:

Manually, by opening each student's record and entering an end date, as described above for mid-cycle departures.

OR

In bulk by using a CSV file containing the student's code and the end date.

This may be imported via File > Import > CSV Files, and the Student option selected.

OR

As part of the process of importing students for the new year via the same Import CSV Files window.

When importing a CSV file of students, you may choose to set the end date of students who are not in the file being imported but are in the database.

This process may only be used when the file being imported contains all of the current students in the school. Otherwise you will be adding an end date to students who have not left.


VELS

The Import Student Details XML process also allows schools in the Victorian Catholic and Government sectors to end date students and Primary schools may use this method to end date their students. However, if your school includes year 11 and 12 students, in most cases, they are not included in the XML file. If this is the case at your school, you cannot use this method for adding an end date to all students who have left. You must use the process of importing a CSV file to update the end dates.


Magnifier

Importing student photos

Viewing all of a student's results

Modifying and viewing student results

Student custom properties