Selection Windows

Accelerus Icon
 

When using many of the processes available in Accelerus, a selection window will be displayed. For example, in order to add additional classes to a student, or extra students to a class, a selection window of classes and students will open respectively. Similarly, selection of subjects need to be made when setting up a report run or when copying assessment items from one subject to others. The Bulk Enrolment window relies on the ability to select students, cohorts and classes, and so forth.

Therefore, familiarity with these windows is necessary.

Selection windows are similar to Explorer windows in functionality. A major difference is there are no icons along a bottom panel, so you cannot perform other functions on the records selected. The window is brought up from another processes you are performing, purely for the purpose of selecting records for that function.

Ent StudentEnrolSelection


The functionality of the selection windows can be divided into the following, applicable in all selection windows


minusCustomising columns

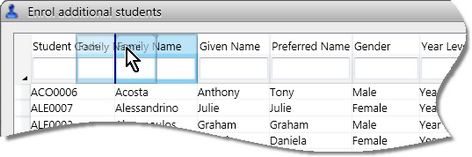
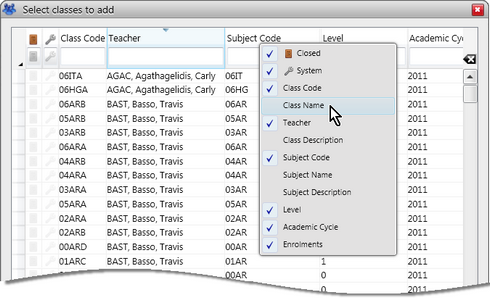
Each selection window has a column for each data field applicable to the selection being made, eg when selecting students, all of the student fields are available. Each of the selection windows has a default set of columns that are visible to begin with, plus the order and width of these are set by default.

However, these columns may be customised and these customised settings will be retained for each selection window, for each user. Therefore, if you change the column order or width, these will be remembered for next visit.


To change the width of a column:

Move your mouse pointer to the right-hand border of the column you want to change.
Holding down the left mouse button, drag the border in or out until it is the width required.
Then, release the mouse button.

UI SelectionColumnResize


You may change the order of the columns, so that the particular selection window always shows them in the selected order, as follows:

Click on the heading name of the column you want to move and hold down the left mouse button.
Drag the column heading to the position in which you want the column.

As the column moves a dark vertical lines appears in the location that the column is moving over.

Release the mouse button to reposition it in the required location.

UI SelectionMoveColumn


Lightbulb

The order in which the columns are displayed has a bearing on the order in which the records are sorted when you reopen a particular selection window. The first column displayed, with the exception of some special dropdown fields found in some selection windows, determines the order in which the records will be sorted when you open the window. Therefore, for example, if selecting teachers or students, you may want to move the family name column to the first column position so that the students and teachers are always sorted alphabetically based on their family name.


Each selection window displays a default set of columns. However, these are usually not the only columns available and you may choose the set of columns you want to display or hide.

When you bring up a selection window and a field is not there that you would like to view or search by you may display it. Likewise, you may hide columns you never use at your school.

Reveal or hide columns as follows:

Right click anywhere in the selection window's heading row - where the names of the columns appear, not in the search fields.
In the menu that appears showing all available fields:
Select a ticked field to toggle off the tick and remove the column from view.
Where a column is hidden and, therefore, not checked, select it to reveal that column in the selection window.

UI SelectionExtraColumns


minusUsing search criteria and wildcards

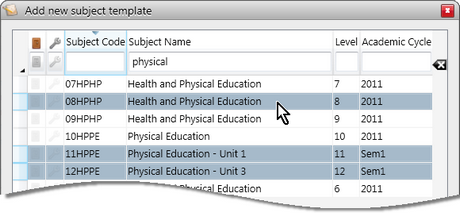
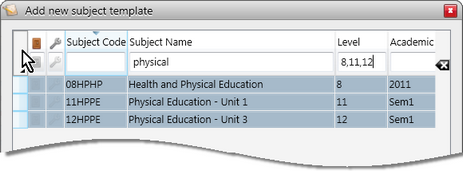
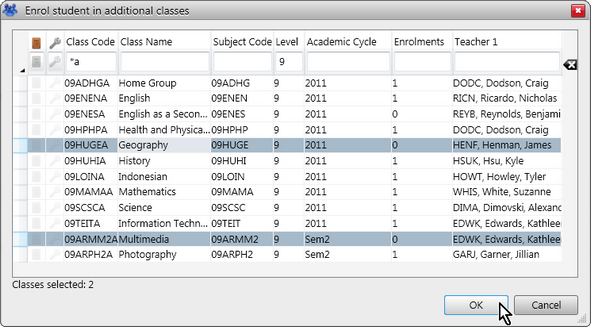
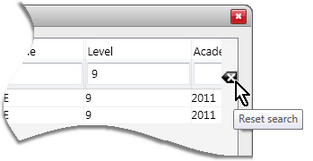
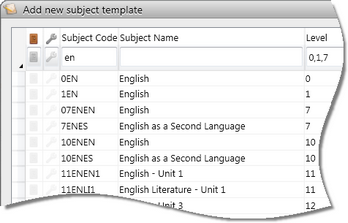
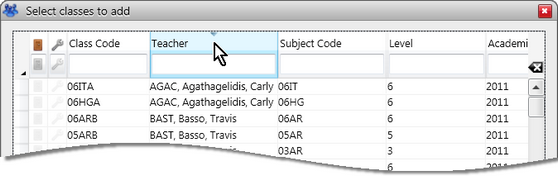
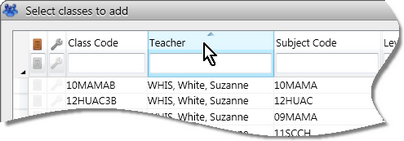
Although you may scroll through the records displayed in a selection window, it is usually easier and quicker to filter the records through the use of search criteria.

You may enter search criteria in any of the search fields found directly below the column names. When entering search criteria, wildcards can be inserted in place of literal characters, with a wide range of wildcards being available. For example, MA* will find all records where the field begins with MA.


You may:

Enter text for any part of the fields for which you are searching, eg ma will find all relevant records where ma is found anywhere in the selected column, such as Maths, Dimatina, Drama, etc.

You may use wildcard characters in the place of one or multiple characters to find all records that comply with the search criteria, eg MA* will find all records beginning with MA.

Note that the search string is not case-sensitive, ie you can enter MAT, mat or Mat to find the same records.

Press Enter.

OR

Wait a moment.
Clicking the Reset search icon at the end of the search field/s will clear out all search criteria and redisplay all records.

UI SelectionResetSearch


minusSorting records

The records displayed in any selection window can be sorted to make finding and selecting particular records easier. For example, all of the displayed teachers may be sorted into alphabetical order based on their code, family name, given name, etc.

The data may be sorted into ascending or descending order. However, the sorting of records is not always strictly alphabetical as Accelerus takes into account that school data usually includes numbers that have a specific meaning, eg year and subject levels.


There are two special aspects to sorting in Accelerus that apply to selection windows:

When you open a selection window, the first column displayed, with the exception of the special dropdown columns found in some windows, determines the order in which the records will be sorted. Usually the first column is the record code.

However you may want to move columns so that another column is first. For example, if in a selection window where students are being selected, you may want to move the family name column to the first column position so that the students are always sorted alphabetically based on their family name.

The records sort in alphanumerical order generally, but in the following circumstances Accelerus sorts the data in a special way:
Subject levels sort in accordance with the order that the levels appear in the Subject Levels tab of the School Settings window.
Where combinations of numbers and letters are used that may indicate year or subject levels, eg 07ENG, MAT10, these records are sorted in a specific manner, so that the records appear in a logical sequence, rather than a strict alphanumeric one.

As shown below, the codes starting 07 and 7 have both between treated as if they were 7, and 07EN does not appear after 0EN as it would in an alphanumeric sort. Also, the codes beginning 0, 1, 10 and 11 have been treated as numbers and not as they would in an alphanumeric sort in which case they would appear in the following order: 0EN, 10EN, 11EN, 1EN.

UI SelectionSortSpecial

Results in list type marking schemes always sort in the order in which the marking scheme values have been set up. Therefore, when teachers are working in a class or subject results windows, when they sort their students on the basis of their grades in any columns using list schemes, they will appear from highest to lowest, or vice versa, and not in alphabetical order.

For example, where the scheme below has been set up, the students will sort in A, U, S, R, N order and not A, N, R, S, U.

UI ExplorerSortMarks


To sort the records in an selection window:

Click the column heading you wish the list to be sorted by.

UI SelectionSortAsc

Where the sort is in ascending order, click again to change to descending order, and vice versa.

UI SelectionSortDesc


Lightbulb

The column by which the table is sorted always appears shaded and an arrowhead above the field name indicates whether the sort is ascending or descending, ie if pointing down or up respectively.


minusSelecting individual and multiple records

In the selection windows, unless the selection specifically only allows one record to be selected, you may select an individual or multiple rows as follows:

Highlight one row by clicking anywhere in its row.
To select multiple individual records, hold down the Ctrl key while clicking each of the other records required.

UI SelectionMultiSelect

To select a contiguous group of records, hold down the Shift key while clicking the last of the records in the group to be selected.
You may also select all records listed by pressing Ctrl A or clicking the top left cell of the Explorer's table of records.

UI SelectionSelectAll

Once you have made you selections, click the OK button.