Importing CSV Files

Accelerus Icon
 

The importing of CSV files in Accelerus is mainly undertaken from the Import CSV Files window.

This window is activated via File > Import > CSV Files, a menu option only available to those with a school level role. The options available within this window will depend on the school level permissions of the user, eg if they do not have the Administer Subject permission assigned to them, the importing of subject records will be disabled.

The window allows eight different types of entity data to be imported, although there may be more options than this in the window, depending on how many different cohort entities have been defined at the school.


VELS

Schools in the Victorian State and Catholic sectors setting up AusVELS reports must import an XML file of students up to and including Year 10 every semester, and not a CSV file through the Import CSV Files window. Special processes are available to import XML files of student details and absence data.

It is important that these schools follow the instructions on the importing and exporting of XML files before proceeding with any importing of data via CSV files.


The CSV import processes are very similar for all types of entities, with some additional features applying to students and enrolments, in particular.

In summary, in the Import CSV Files window:

One CSV file at a time, for one entity, is imported.
There is a preprocess phase where the data in the file being imported is compared to the data already in the database, and the user is informed of the impact of the changes before the data is imported.
For each of the types of issues identified, the user is informed of the action that will be taken, or they may change this action.
They then choose to proceed with the import or return to the CSV file and correct any problems before preprocessing it again.

CSV ImportCSVWindowNumbers


Since so many entities may be imported via the same window and as it must take into account so many potential issues with the data, the window is quite complex, but also very powerful.


#

Feature

1

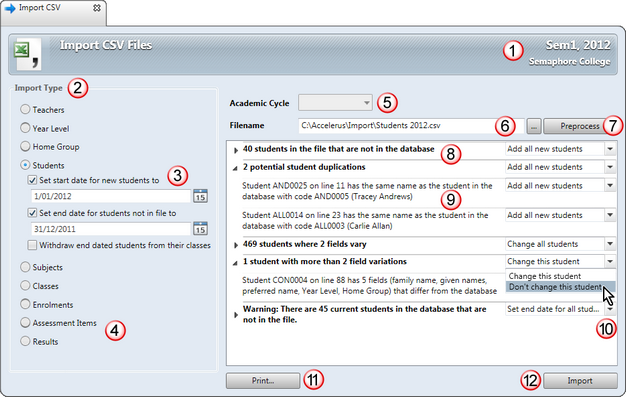
The academic cycles into which data is being imported are displayed in the top right of the title bar. It is vitally important that the correct cycles have been selected in the Academic Cycle Selector. Otherwise, data will be imported into the wrong cycle, eg the wrong year or semester. In some cases, this cannot be easily reversed.

2

An option button appears for each entity type that may be imported into the database. You select the type of file you are importing, as only one file for one entity may be imported at the one time.

In the case of cohort entities, there will be a button for each cohort type that has been defined in the School Settings window, eg one for Year Level and one for Home Group.

The entities are displayed in a particular order - the order in which they should be imported when setting up a database, to ensure that all of the prerequisite data already exists in the database. For example, you cannot import classes unless the subjects they belong to have been imported.

3

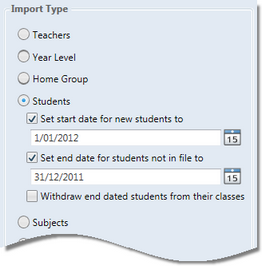
In the case of importing students, start and end dates may be set as part of the import process so that new students are automatically assigned a start date and students who have left an end date. In addition, students who have left may be withdrawn from their classes.

It is important to be fully aware of the implications of using these options and when they can or should not be used.

4

Of all of the import types listed in the window, the bottom two - Assessment Items and Results - are not a normal part of the importing of data to set up a school's Accelerus database. They are additional options, used in specific circumstances only.

5

The Academic Cycle field only applies when importing subjects and cohorts:

In the case of cohorts, when they are added in the School Settings window, the academic cycle category that applies is selected, eg Annual. Therefore, when importing into the Sem1, 2012 cycles, as shown above, they must belong to 2012, and this will be automatically displayed in the Academic Cycle field.
Subjects being imported, however, could potentially belong to any of the cycles currently available, in the above case Sem1 or 2012. Therefore, you must select the cycle from those available in the Academic Cycle dropdown list.

Although classes and enrolments belong to a subject, you do not need to select the academic cycle for these. The subject of the classes is nominated in the CSV file and the class will be associated with its subject, whatever its cycle. Likewise, enrolment CSV files nominate the class and, from this, the subject can be ascertained.

6

The path and name of the file that is being imported for the selected import type is either entered manually, or you may click the Browse icon at the end of the Filename field to select it.

7

The Preprocess button will run a process which compares the data in the CSV file with that in the database, and informs you of the impact of the import on your database prior to actually committing the changes. Issues, errors and warnings are reported back, and displayed in the pane below.

Corrections may be made to a CSV file being imported and the Preprocess button clicked again to refresh the listed issues.
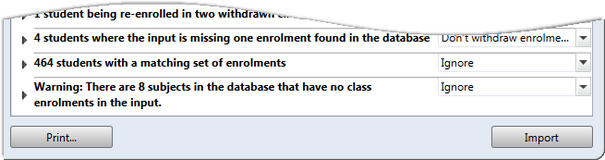
8

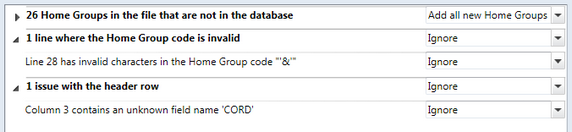
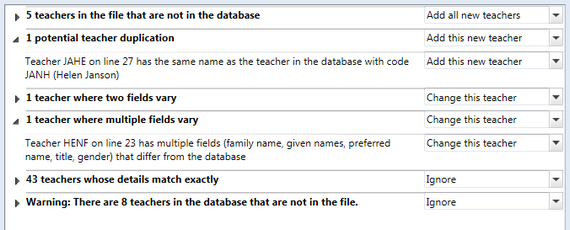
The Preprocess pane lists all of the issues, errors and warnings under broad types or issue categories, eg records not already in the database that will be added, cases of potential duplications, etc.

To begin with, only the issue headings are displayed. Users may double click a heading, or click the arrowhead to its left, to display the details of the records to which the issue applies. Double clicking again will hide the details.

9

In many cases, the details for an issue do not need to be revealed, eg 40 students in the file but not in the database, as shown above. These are clearly the new students for the year.

However, in others it is very important that all of the issues are read carefully and the individual lines to which the issue pertains are checked carefully. By revealing the details of an issue, you may investigate further and take steps to remedy any problems, if necessary.

If any issues are raised that you do not expect, it is recommended that you cancel out of the import process and investigate these further. This may mean that you will need to make changes to the CSV file and then preprocess again.

If you choose to ignore errors or unexpected issues, further problems may occur when you import the next file. For example, if there is an error in a subject record preventing its import, this may impact on the importing of classes and enrolments.

10

For each issue type, there is a dropdown action box. A default action will be displayed, eg Add all new students, or Ignore where no action will or needs to be taken. In most cases, alternative actions are available for selection from the dropdown list.

You may also change the action for an individual record, when the details are displayed. In this case, the issue heading's action will automatically change to Individually Specified.

11

The Print button allows you to preview and print out a copy of all issues and selected details, if you need to investigate further. The printout will only include the individual details of the issue rows that are currently open. Where an issue is contracted, only the issue header will be printed.

12

When all issues have been investigated and corrected, where necessary, clicking the Import button will import the data into the database, making changes in accordance with the displayed or selected actions.


minusPrerequisites

Before you begin importing data via CSV files:

Ensure you have set up all of the required database parameters in the School Settings and Security windows, eg academic cycles, cohort types, subject levels, and roles.
Take a backup of your database.
Prepare your CSV files in the correct format for each type of entity, making sure that the fields therein conform to the field specifications.
In the case of subjects, prepare a separate CSV file for the subjects for each of your different cycles, if more than one, eg one for annual subjects and one semester subjects.
Ensure the Import CSV Files window has the correct cycles displaying in the top right corner of its title bar.
You must import data in the correct sequence, ie in the order in which the Import CSV Files window displays the different types of records:
Cohorts, eg Year Levels, Home Groups, etc.

Note that, if student records are not yet available or finalised, you may proceed with subjects and classes, but will not be able to import enrolments until the students have been imported.


minusImporting into the correct academic cycle

It is extremely important that data is imported into the correct academic cycle. There are two aspects pertaining to this issue of which Accelerus administrators must be aware:

Because it is so easy in Accelerus to view data from previous cycles, there is always the potential that you have the wrong academic cycles selected in the Academic Cycle Selector when the Import CSV Files window is opened.

Even if you then change the cycles via the Academic Cycle Selector, the open window will still belong to the wrong academic cycles. Therefore, you should select the cycles before you open the Import CSV Files window. If it was already open when you selected the correct cycles, close and reopen it.

When you have more than just annual academic cycles in your database, at any point in time, more than one cycle will be active at the same time, eg Term 1, Sem1 and 2012. Therefore, subjects could potentially belong to any of these current cycles. You may even have some belonging to Term1, some to Sem1 and others to 2012.

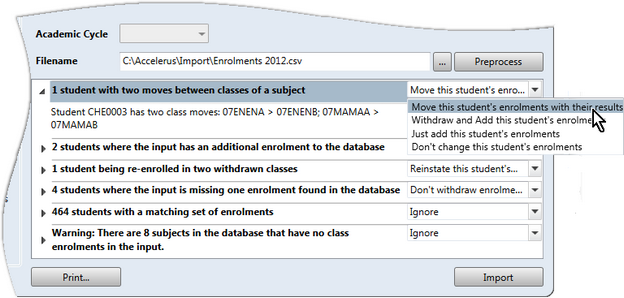
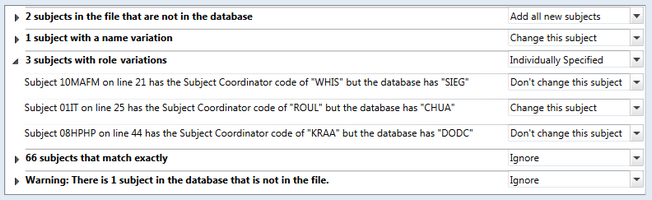
This means that you may have to undertake several imports of subject, eg all of the annual subjects in one import and all of the Sem1 subjects in another, and so forth.

Prepare your subjects in separate CSV files for each academic cycle and import them one at a time, selecting the correct academic cycle for each in the Import CSV Files window.

If you make an error and import subjects into the wrong academic cycle which is a parent or sibling of the correct cycle, eg semester subjects were imported into an annual cycle, you may reimport the subjects into the correct cycle.

In this case, the preprocess stage will report subjects with a different academic cycle, as shown here, and allow you to change these, moving them to the correct cycle, and all of their dependent data with them, eg their classes, assessment items, etc.

CSV ImportWrongCycle


Warning

If you incorrectly import subjects down the cycle tree, ie into a child cycle, eg annual subjects were imported into a semester cycle, you must delete all of the subjects in the wrong cycle via the Subject Explorer. This means all dependent data will also be deleted, eg classes, enrolments, assessment items and results for the subjects. You must then reimport them into the correct cycle.

If you only discover this error some time after the fact, once assessment items and even results have been recorded against the subjects, very little can be done.


minusSetting student start and end dates

When importing students via the Import CSV Files window, you may optionally set start and end dates in student records.

Using these options, especially at the beginning of a new school year, will allow you to easily set the start date for first-time students. Also, it is a means for setting the end date for last year’s Year 12 students, as well as other students who have not returned in the new year.

When used mid-cycle, it may be handy to both withdraw and set the end date of those who have left.

CSV ImportStudentsDates

These settings work as follows:

If you tick the Set start date checkbox, any student who is not in the database already but is in the CSV file is considered a new student. They will automatically be assigned the start date entered in the start date field.

You would not set this option if you are just setting up Accelerus for the first time as the date you enter will not be a true reflection of when the students you import started at the school.

By ticking the Set end date checkbox, all students who are found in the database but are not in the CSV file will be assigned the stipulated end date.

This may be useful when importing all current student records at the beginning of each year, to automatically set the end date of those who left, eg all of the Year 12 students.

Where the Set end date checkbox has been ticked, the Withdraw end dated students checkbox becomes available.

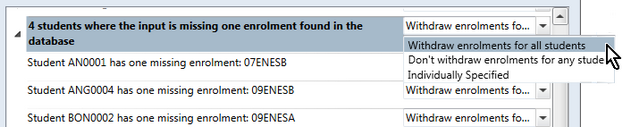
When this is ticked, students whose end date is being set will be withdrawn from all of their classes in the currently selected academic cycles or any future academic cycles.

For example, at the beginning of semester 2 2012, you may be importing a CSV file of all students, in order to update your database. You could set the end date to the last date in semester 1, eg 30/6/2012, tick the Withdraw end dated students box. When you import, all students who are missing from the CSV file will have their end date set to 30/6/2012 and these students will be automatically withdrawn from any classes that belong to the semester 2 or 2012 academic cycles.

If the CSV file you are importing contains start or end dates for students and you set choose the options to set the start or end dates in the Import CSV Files window, the dates in the CSV file will be used, if not blank.


VELS

AusVELS schools who use a Student Details XML file from their school administration package to import students up to and including Year 12, should not set the end date in the Import CSV File window when they are importing a file containing their Year 11 and 12 students only. If they do, all students from all other year levels will be end dated.


Warning

In order to be able to use the end date settings when importing, the CSV file must contain all current students at the school. Otherwise, you will be setting the end date of students who are still current.


minusPreprocessing features

When importing data using the Import CSV Files window, before the data is committed to the database, a Preprocess button is clicked. This compares the records in the CSV file with the data already in the database, so that any errors or unexpected situations may be rectified before the data is imported.


At the end of the preprocess phase, the user is informed of:

Issues that will impact upon the database if you proceed, eg records in the import file not already in the database, which may be added; cases of potential duplications, where data has been changed, etc.
Errors that may have been found in the CSV files, eg incorrect number of fields, missing fields, duplicated lines, incorrect headers, etc, which prevent the import of the data.
Warning messages where there were discrepancies between the file and the database, eg records in the database but not in the file. These are listed so that the user is aware that some records in the database have not been affected, and this may not have been expected.

You may make decisions about the importing of records under the different issue headings, expanding each of these to reveal their details. You can then choose from the dropdown list of available actions.

CSV ImportPreProcessHG

For example, as seen above:

There are 26 home groups which will be added to the database:
One Home Group where the code is invalid. Clicking open this issue shows that the record on line 28 has '&' in its code, a character that is not allowed. As a result, the record will not be imported, ie the action is Ignore.
One issue with the header row whereby the column that is headed CORD is not correct.

This would be rectified by going to the Security window and checking what the name or code of the Home Group role is there and inserting one of these in the CSV file's header.

Note, however, that because cohort roles are not mandatory, the records will still be imported, in this case, but without a home group teacher.


Warning

Do not ignore messages in the preprocess pane. Expand and read each section and, if necessary, print out the preprocess log by clicking the Print button.

When there are errors or missing data, do not go ahead with the import but make changes to your CSV file and then reimport, making sure that you have an error-free import each step. Otherwise, an error in one import, eg subjects, may result in hundreds of errors further down the line, ie in classes and enrolments.


Teacher and student records are perpetual, ie a teacher is added once to the database and remains on it perpetually. Therefore, the codes of teachers and students need to be unique. Because of this, when importing teachers and students, there is the potential that a code is duplicated, eg a new teacher has been assigned the code of a teacher who left some time ago.

Therefore, the import preprocess phase checks for and reports on any possible duplications. These reported issues should be checked carefully.

CSV ImportPreProcessDuplication

There are two types of possible duplications that should be looked for, both of which are reported in the above example:

Where the surname and one of either the given name or preferred name of a teacher or student in the import file matches that of a teacher or student, respectively, already in the database, but the code differs. This will be listed separately as a potential duplication.

For example, as shown in the first expanded issue above, teacher JAHE's details match those of a teacher JANH. It may be that there are two Helen Jansons and, therefore, the new teacher should be added. Otherwise, if it is an actual duplication, you may choose to exclude JAHE from the import process.

The second type of possible duplication is where the student or teacher code is already in the database and is now being imported with different details, ie the code is being reused for a different person.

A message regarding multiple field variations will be displayed, and you should be concerned if there is more than one field variation in the case of teachers and more than two for students.

Referring to the above example, again, there is one teacher with multiple field variations. Teacher HENF has not only changed all of their names, they have changed gender. It appears code HENF is being reused and, as a result, all of the data from the HENF in the database will attach to the new HENF if the import goes ahead. This may be a case of the original HENF having left and a new person being assigned the code and you would most likely change the original HENF's code in the Accelerus database.

In other cases, it may be there are multiple field variations because the teacher or student changed their names.


For each issue type listed in the preprocess pane, there is an action field which specifies what will occur when the import proceeds.

The actions available for any issue will vary according to the type of issue and the type of record that is being imported. For each issue, a default action will be displayed and others are available from the dropdown list. The exception to this is when the action is Ignore which means that no action can or needs to be taken, eg there is no changed data or there are errors that prevent the data from being imported, thereby an alternative cannot be available.

Actions may be changed:

At the issue type level, ie applied to all individual records to which the issue applies.
At the individual record level, when an issue's details are displayed.

In this case, the heading's action will automatically change to Individually Specified.

As seen below, there are 3 subjects with role variations. At the heading level, Individually Specified appears because the some of the three records concerned have had different actions selected.

CSV ImportActions

Generally, with the exception of available actions for enrolments, actions can be classified into:

Add ..., eg Add all new subjects will add the specified number of subject records to the database.
Don’t Add ..., whereby the record in the CSV file will be skipped or ignored.
Change ..., eg Change all teachers, whereby the listed teachers who already exist in the database will be changed to reflect the data in the CSV file.
Don’t change ..., or Make no change ..., so that the database record remains as it is, ignoring the change in the CSV file.
Ignore means that no action can or needs to be taken, eg there is no changed data or there are errors that prevent the data from being imported.


minusEnrolment import issues

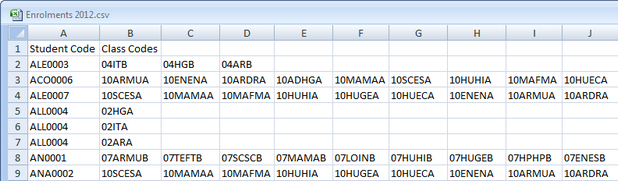
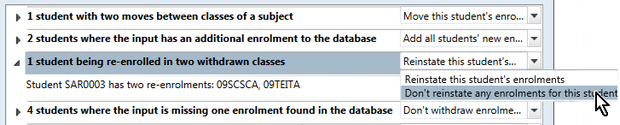
The Enrolments import process is somewhat different than when importing other types of records in the Import CSV Files window. It needs to deal with all sorts of combinations of enrolments, and perform a large number of checks and comparisons, reporting back on these in the preprocess phase.


There is no limit on the number of classes which may be imported for each student, or the number of lines for each student. For example, the import file may contain several lines of enrolments for the one student. Each enrolment line may also contain different numbers of class enrolments.

The file below is a valid enrolments CSV file. Some students have all of their classes on one row, while others have multiple rows of classes, eg ALL004 on rows 5, 6, and 7.

The enrolment import process will combine all enrolments for the one student, no matter how many rows they are spread across.

CSV ImportEnrolmentCSV

Note that Class Codes as a heading only needs to be added to the first column of classes.


The import process allows great flexibility in that you may import a full enrolment file of all enrolments for all classes for the current academic cycles through to those just for a particular subject, class or individual student.

Examples of importing partial enrolment files include:

Where there are term academic cycles, only the enrolments for the term subjects are imported.
A school may have their Instrumental Music enrolment data in a different database and this gets imported separately to all other enrolments.
A CSV file is prepared of student class movements for an academic cycle, ie only new or changed enrolments are included.

In order to deal with partial imports, and not tediously list all of the other subjects in the academic cycles, the preprocess phase only compares and reports back on subjects referenced in the CSV file.

In the case of the Instrumental Music example, if only classes of these subjects are found in the CSV file, only they will be checked for duplications, withdrawals, etc.

Likewise, if importing just specific term subjects, all of the semester subjects will be excluded from the comparisons.

However, in case enrolments are missing inadvertently, a warning message will be displayed, allowing you to check all the subjects in the database for which there are no class enrolments in the import file. Therefore, if the classes of particular subjects should not be missing, the import process may be cancelled, the CSV file amended and the import process recommenced.

In the example below, the warning message informs us of 8 subjects in the database for which there are no class enrolments.

On checking the details for this warning message, we might discover that that the subjects in question were missed in error. Or, perhaps they are subjects for which another CSV file is to be imported, or another enrolment method is to be used, eg the Bulk Enrolment window.

CSV ImportWarnings


There are three import situations that occur with enrolments that you need to be aware of and pay particular attention to, each of which is shown in the preprocess pane below.

CSV ImportEnrolmentOptions

It is considered a potential move when a student is enrolled in one class of a subject in the database but the import file has them in another class of the same subject.

This has occurred in the first issue reported above, where Student CHE0003 appears to have moved class in two subjects.

In the case of a potential move, the actions available are that the student:

May be moved, together with any results, from one class to the other.
Is withdrawn from the class in the database and a new enrolment added for the class in the CSV file.
Is enrolled in the new class, as well as remaining in the old.
Retains the enrolments as they are in the database, ie the new enrolment is ignored and the old enrolment remains.


Messages regarding re-enrolments appear, as shown below, when a student has been withdrawn from a class in the database but an enrolment for the same class is found in the import file.

In such cases there are only two available actions:

The student's enrolment is reinstated, ie the withdrawn status is removed.
The enrolment remains withdrawn, ie the import file is ignored for the particular enrolments.

CSV ImportEnrolmentReenrol

Where enrolments that are in the database for a student are missing from the import file, you may choose to withdraw the student from the classes in the database, on the basis that those in the import file are the full set of current enrolments. Alternatively, the enrolments in the file can be imported, in addition to those in the database, which will occur if the Don't withdraw enrolments option is chosen.

CSV ImportEnrolmentWithdraw


Warning

If the enrolment variations applying to a student are multiple and complex, the preprocess phase will not list them all individually, but inform you that multiple variations exist. You may only choose one action to apply to all enrolments, the safest, in this case, being to not change the student's enrolments in the database while you investigate further or manually make the changes.