Database Listings

Accelerus Icon
 

Accelerus has a wide range of database listings available for users to preview and/or print. These include various listings of students, teachers, classes, enrolments, assessment items, marking schemes, etc.

They allow you to selectively output information from the Accelerus database by entering selection criteria, to restrict the listing to particular records. For example, instead of listing all subjects, you might want to list just those for a particular year level, or those which are coordinated by a particular teacher, and so forth.

Different selection criteria fields are available for different listings. When you click on one of the listings in the Data Listing window, the available selection criteria for that listing will be displayed.

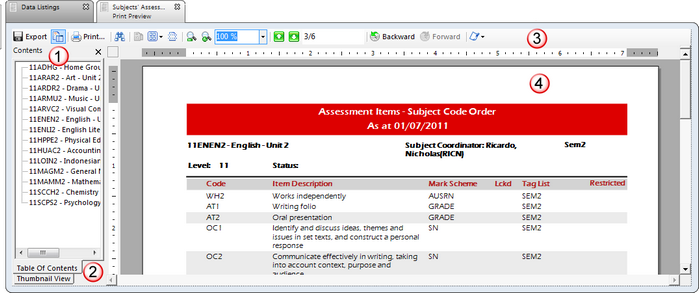
Once a list has been sent to the Print Preview window, you may then choose to print all or part of it, scroll through its pages, export it to a file, and other actions.


Ent DataListingsWindowNumbers


#

Feature

1

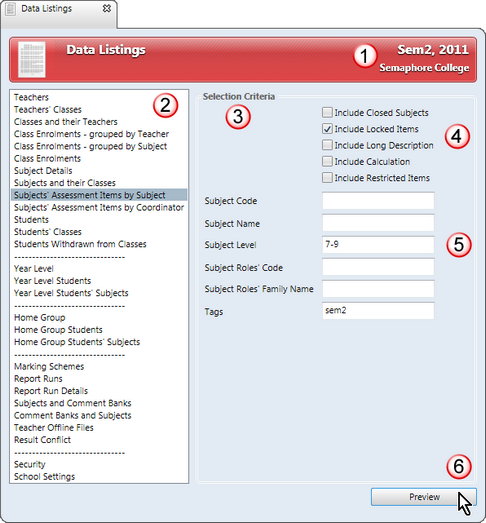
Most of the data listings available apply to the academic cycles currently in force in the database, as listed in the top right-hand corner of the Data Listings window.

Note, however, that some of the listings are perpetual and not influenced by the academic cycles, eg marking scheme listings.

2

Click the particular listing you require from those listed in the table.

3

The Selection Criteria section will vary according to the listing selected. These allow you to limit your listing to particular records.

4

Many of the listings include a set of checkboxes which may be ticked to include particular records, applicable to the particular listing.

5

You may enter search criteria in one or more search fields, including using wildcard characters, to restrict the listings to matching records, eg enter *MAT in the Subject Code field to include only subjects ending with MAT.

6

Clicking the Preview button brings up a window from which you may view the particular listing prior to printing it.


minusSteps to preview and print

To select listings to print or preview in Accelerus:

Go to the File menu and select Data Listings.
Click the particular listing that you require.

For most listings, when highlighted, a set of search criteria applicable to the listing become available, if you wish to limit the listing to particular records.

Tick any of the search criteria checkboxes that may be available, if required.
Enter any search criteria in the available fields to restrict the listings to matching records, using the same search protocols as in Quick Find and Explorers, including entering wildcard characters.
Click the Preview button, or double click the listing.
In the Preview window, as required, move through the pages of the listings, export to an external file, make annotations, or perform any other preview option available via the toolbar.
To print the report, click the Print icon in the toolbar to bring up a Print dialogue box from which you chose the pages to be printed, number of copies, etc.


minusEntering search criteria

You may enter search criteria for most listings in order to restrict the data in the listing to particular records. For example, instead of listing all subjects, you might want to list just those for a particular learning area, or those which have not been closed off, and so forth.

Different fields are available for different listings. When you click on one of the listings in the Database Listings window, the available selection criteria for that listing will be displayed.

Two types of restrictions are generally available:

Checkboxes to include or exclude certain types of records, eg current teachers, closed subjects or withdrawn students.
Fields in which you may enter text, including wildcard characters. The same set of wildcard characters used in the Quick Find and Explorer windows in Accelerus are available here, eg * or ? in place of multiple or single characters respectively.

You may enter selection criteria in as many fields as needed, and/or check the combination of checkboxes required, with each restricting the selection even further.

NB When entering search criteria in date fields, you may use date formats such as 28/2/12, 02.2.2012, etc. However, do not use hyphens as delimiters in dates as the hyphen is a wildcard signifying a range, eg 2/2/2012-13/3/2012.

Ent DataListingsCriteria

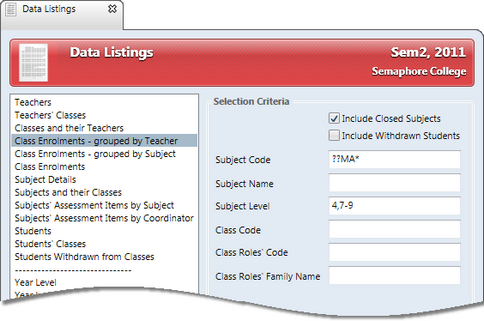
In the example shown above, for a Class Enrolments listing, only classes of subjects with a code where the third and fourth letters are MA are to be selected and, of these, only those where the subject level is 4, or between 7 and 9

In addition, any subjects which have been closed off that meet these criteria will be included.


minusAvailable data listings

The table below contains a brief description of each of the listings available from the Data Listings window.


Listing

Description

Teachers

Lists, in alphabetical order, teachers’ details. When the Current teachers checkbox is ticked, teachers are only included if their end date is after and their start date is before the end of the currently selected cycle.

Teachers' Classes

Lists current teachers in alphabetical order, together with their class details, but does not list the students in the classes.

Classes and their teachers

All classes for the current academic cycles are listed, in alphabetical order, with details of the subject they belong to and their teachers.

Class Enrolments grouped by teacher

For each teacher, their classes and the students enrolled within them are listed. Each teacher’s listing begins on a new page.

Class Enrolments grouped by Subject

For each subject in the current cycles, all classes and their teachers are listed, together with a list of students enrolled in the classes. Subjects are listed in Subject Code order, with each subject commencing on a new page.

Class Enrolments

This listing is similar to the one for class enrolments grouped by teacher, except that it includes a count of non-withdrawn students in the class and allows the user to specify if a page break is to inserted after each class.

A Page Break on Class checkbox appears in the Selection Criteria section for this listing.

Subject Details

This lists the base details found in the subject records, including the academic cycle the subject belongs to. It optionally includes the full subject description text and closed subjects when their respective checkboxes are ticked.

Subjects and their Classes

Lists subjects and the name of the teachers who have a subject role, eg Subject Coordinator, in Subject Code order. For each subject, the classes codes and class teachers are listed.

Subjects' Assessment Items by Subject

&

Subjects' Assessment Items by Coordinator

These two reports have the same format except that one is grouped by Subject and one by Coordinator.

Both formats list subjects and the teachers with a subject level role, together with details of the assessment items set up for each subject.

The format by Subject sorts the listing into alphabetical order based on Subject Code. The by Coordinator option groups the subjects by their teacher who has a subject level role, firstly, and then each subject in alphabetical order within each grouping.

Both reports list the assessment items for each subject in the order in which they have been defined in the subject's Assessment Items table.

Students

An alphabetical listing of students, including their cohort group memberships and start and end dates. Students who are not current may be optionally excluded from the listing by checking the Current Students only box. Current students are those whose end date is after, and their start date is before, the end of the currently selected cycle.

Students' Classes

Lists students in alphabetical order, with their class details for the currently selected academic cycles.

Students Withdrawn from Classes

A listing of all students who currently have a Withdrawn status against any of their classes.

Cohort Type, eg Year Level, Home Group, etc

For each cohort type defined by the school, eg Year Level, Home Group, etc, a listing of all the groups set up for the selected academic cycles is available. It lists the groups in alphabetical order, together with the names of teachers assigned to cohort roles.

Cohort Students

For each cohort type defined, this lists the cohort groups for the academic cycles selected, together with the teachers assigned to them and the details of the students within these, in alphabetical order.

Cohort Students' Subjects

A listing of students divided into their cohort grouping, eg into each year level or home group. For each student, their classes are listed, together with details of the class teachers.

Marking Schemes

This lists all marking schemes that have been defined in the database, including the type, the numeric parameters and comment limits, and the list of entered, displayed and reported values, as appropriate to the type of scheme.

Report Runs

This lists alphabetically all report runs with dates that overlap the current academic cycles, together with the template path nominated for each report run in the Prepare Print Run window.

Report Run Details

For the selected report runs, the listing shows all of the the details found in the Report Runs listing, plus all of the portions, slots and subjects that make up the report run.

Subjects and Comment Banks

A listing of all of the selected subjects and the names of all school comment banks that have been assigned to them.

Comment Banks and Subjects

For each school comment bank, this lists the subjects to which it has been assigned.

Teacher Offline Files

The full history of an offline file may be listed, including the type of activity, eg that it was collected or synchronised, the date, as well as details of the file and Synchroniser computer.

The listing's search options allows you to select just particular types of activities, particular dates or just the last activity for each offline file.

The listing is in alphabetical order based on the teacher's family name.

Teacher Web Access

Prints the last date that each teacher logged into Accelerus Web and accessed their classes and data. The listing's search options allows you to select particular teachers and particular dates.

Result Conflict

Any results that have been sent to the Result Conflicts table, as visible in the Result Conflicts Explorer, may be listed. These are grouped by the code of the teacher who modified the result. For each result conflict, the class, subject, student and assessment item codes are listed, plus the result entered, the time it was modified and the reason it was sent to the Result Conflict table.

Security

All of the school, subject, cohort and class roles that have been defined at the school, found in the Security window are listed, together with the permissions that have been activated for each.

School Settings

All of the various settings found in each of the tabs of the School Settings window may be listed.


minusPreviewing a listing

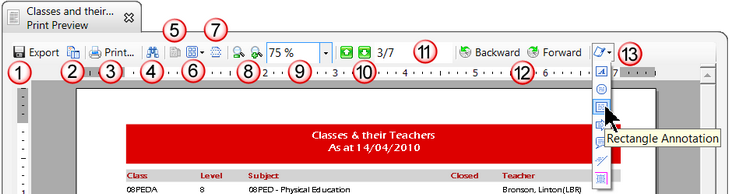
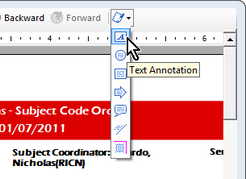
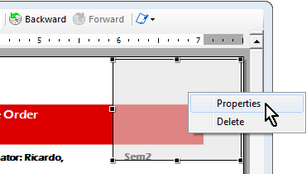
When you click the Preview button in the Data Listings window, you are taken to a Print Preview window which not only allows you to view the listing on screen, but to print selected or all pages and export the listing.

The toolbar at the top of the Print Preview window contains a wide range of tools that activate the many features of the window.


The Print Preview window has many features that facilitate the previewing, printing and exporting of database listings.

Ent DataListingsPreview


#

Feature

1

The Table of Contents groups the records found in the listing. In some cases, these groups may be opened further to reveal sub-groupings or records.

Click the required record or group to be taken directly to its page in the listing. You may hide the Table of Contents by clicking its icon in the toolbar.

2

You may toggle between Table of Contents and Thumbnail view, the latter allowing you to see and scroll through thumbnails versions of the pages of the report. Clicking on a page's thumbnail takes you directly to that page of the report.

3

The Preview window's toolbar contains a wide range of icons allowing you to control the look of the listing in the preview window, as well as to print or export the listing to a file.

4

The listing is shown in the Print Preview window. Most of the icons in the toolbar control the look of the listing in the window, eg you may zoom in or out, to see more or less of the listing, control how many pages are shown at once, etc.


When you click the Preview button in the Data Listings window, a Print Preview window will be displayed. The toolbar in this window contains icons for all of the features available in this window, as covered below.

Ent DataListingsPreviewToolbar


#

Feature

1

The Export icon allows you to export the listing to a PDF document, an Excel worksheet or a CSV file. When you select this icon, choose the file format from the Save as type field in the Export window.

Ent DataListingsExport

2

The Table of Contents icon allows you to show or hide the table of contents and thumbnails pane in the Preview window.

3

Clicking the Print icon brings up a Print box from which you choose the printer, number of copies, and other printer preferences.

4

You may search for text in the listing by clicking the Find icon. The Find window contains options to match the case and whole word, and to search up or down.

5

Click the Single Page View icon to display the listing in the Print Preview window one page at a time.

6

Click the dropdown arrow for the Multiple Page View icon to display from 1 up to 6 pages of the listing at a time. Highlight the number of pages and their configuration, eg 2 pages across or under each other.

7

Click the Continuous Scroll icon to scroll through the pages of the listing continually, rather than at a single page or multiple pages at a time.

8

Click the Zoom In and Zoom Out icons to see more details or to preview the overall look of the listing, as required, with each click displaying less or more of the listing, as appropriate.

9

Select the required zoom size of the Print Preview window by clicking the Zoom Value icon's dropdown list. You may select from preset percentages, page width and whole page view.

10

You may move through the pages of the listing by clicking Previous Page and Next Page icons.

11

The Page Index box displays the current page's number and the total pages, eg 1/2. Enter a page number to move directly to that page.

12

The Backward and Forward icons allow you to go through previously viewed pages, in the same way as you would use Back and Forward in a web browser.

13

To use annotations in the listing:

Click the Annotations dropdown list, selecting the type of annotation you wish to add.

Ent DataListingsTextAnnottion

Drag the annotation to the location required, and release.
You may change the properties of an annotation, including adding text to it, by right clicking and selecting Properties.

Ent DataListingsAnnotationsProperties