Working with Subjects

Accelerus Icon
 

Much of the Accelerus administrators' time is taken up with the management of subjects in the school. It is very time consuming, especially the first time that a school sets up.

It is an area where errors may be made, some of which cannot be easily fixed, so care should be taken. There is an order in which tasks should be undertaken, some of these having a chapter of their own. Other tasks may need to be carried out on an ongoing basis or as the need arises.


minusOrder of tasks

Before you can add subjects to your Accelerus database, the following must have been set up:

The academic categories and their cycles that apply at the school, in the School Settings window.
Subject levels in the School Settings window.
Subject roles if you wish to assign teachers, eg subject coordinators, to your subjects.


Subjects may then be imported into Accelerus, into the correct academic cycles, and from there:

The assessment items for the subjects may be set up, a big task.
Students, classes and enrolments are imported.
Finally, report runs must be set up, to which subjects are added and their report templates created.


Lightbulb

Students are not required in order to be able to set up subjects, their assessment items or their report templates. Therefore, if the students haven't been finalised at your school, you may go on and get the important work of setting up the subjects done. You need only import the students prior to enrolments.


minusClass functions in a subject window

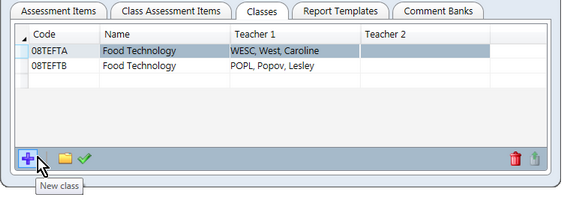
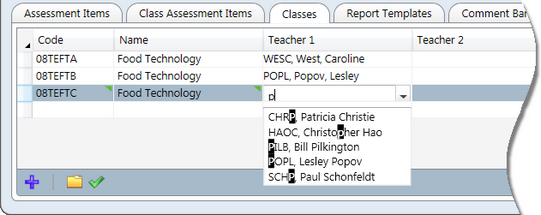
The subject window has a Classes tab. This lists all of the classes that belong to the subject, as well as allowing further functions to be performed.


Several class functions may be carried out from the Classes tab, using the icons that appear in the tab's toolbar.

Ent SubjectClassTab

New classes for the subject may be added, directly into the table, the most useful of its functions.

This is covered in detail below.

You may open the class details window of any classes of the subject, in the way you open most linked records in tables in Accelerus.

The only difference in this window is that you cannot double click a class to open it, as this is an editable grid. You must:

Click the Open class details icon.

OR

Right click and select the Open class details option from the right click menu.

OR

Press Ctrl O.
The class results window in which student's results are entered by teachers may be opened for the classes of the subject by clicking the Open class results icon.
Classes may be deleted directly from the subject window, rather than through the Class Explorer, using the Delete classes icon.

The standard deletion protocols apply, including messages appearing about the extent of the deletion.

Ent SubjectClassDelete


You may add new classes to a subject directly in the table of the Classes tab, as an alternative to adding classes through the New menu or by clicking the New class icon in the toolbar.

The advantage of adding classes directly into the subject window is that you do not have to nominate the academic cycle or the subject - these are already known. Also, when a new subject has to be created, new classes must be created as well, and this can all be done in the one subject window.

On the other hand, however, you are not able to add a class description to the new class via this tab, but would have to go into the actual class record to do so. Given, in most cases, schools do not have a class description that is different to that used by the subject, this is not a big disadvantage.

To add a new class to a subject:

Use Quick Find or the Subject Explorer to find and open the particular subject you require.
Click the Classes tab of the subject window.
Click the New class icon in the bottom right toolbar of the Classes tab.

OR

Double click in the Code cell of the last, empty row in the table.

Ent SubjectAddClass

Type in the code of the class, which must be a unique class code for the current academic cycles.
Press the Tab key to move to the next column and type in the name of the class, usually identical to the subject name.
In any of the class role columns where a teacher needs to be assigned:
Begin typing part of the teacher's name so that all of the teachers with matching text will be displayed.
As you keep typing, the names will be filtered further and, if the name of the teacher required appears in the cell, tabbing will select him or her.

OR

Select the teacher from the dropdown list.

Ent SubjectAddClassTeacher

Save the subject by pressing Ctrl S or clicking the Save icon.


minusChanging the subject of a class

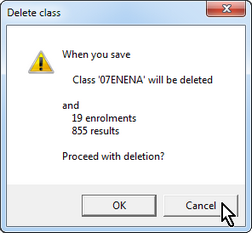
In very exceptional circumstances it may be necessary to change the subject to which a class belongs. This means not only are the classes being moved to a different subject but that all of the enrolments for the classes and the results that were entered for the classes under the original subject will be transferred to the new subject.

The potential for result data becoming invalid is great as the assessment items, their markings schemes, and their meanings may be very different between the two subjects.

You should only change the subject of a class if one of the following circumstances is true:

There are no assessment items yet.

OR

The teachers of the class have not yet had access to the class, eg if working on offline files, it does not yet appear therein.

If they have received it, there is the potential that results have been entered and therefore will be deleted or invalid.

OR

The assessment items in the two subjects are identical, with the exact assessment item codes and marking schemes, in particular.


If these conditions are met, to change the subject of a class follow these steps:

Use Quick Find or the Class Explorer to find and open the class that needs to be moved.
With the class open, go to the Tools menu and select Change Subject.
In the Move Class to Subject selection window that appears:
Enter search criteria to find the particular subject required, including using wildcards.

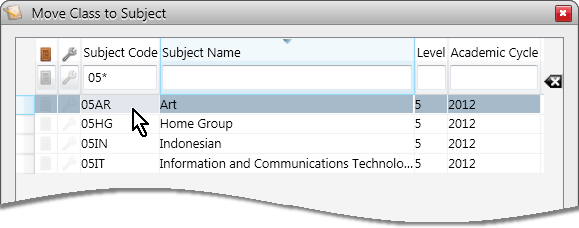
For example, below, 05* has been entered in the Subject Code column in order to find subject codes beginning with 05.

Highlight the subject to which the class is to be moved.
Click the OK button.

Ent SubjectMoveClass

The class' open window will now display its new subject code.


minusA subject's report templates

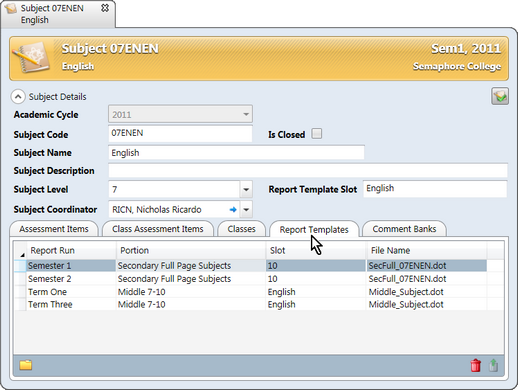
The Report Templates tab in the subject window displays the details of the templates that are used by the subject in the various report runs it is associated with.

Ent SubjectReportTemplatesTab

Report runs have a structure, whereby there are different report portions, or sections of the report, and within these there are slots that determine the order in which subjects are to print within the portion. All this information is displayed in the Report Templates tab, as well as the names of the actual templates used.

There are several advantages in coming to this tab when working on a report run:

You can see in one place when the particular subject is being reported upon.
You do not have to scroll through possibly hundreds of subjects in different slots and portions to find the particular subject.
You can go directly to the report run of a particular row by:
Highlighting it and clicking the Open report run icon.

OR

Double clicking the row.

Multiple rows may also be selected and their report runs opened in the one process.

You may remove the subject from particular report runs by highlighting the row and clicking the Remove icon in the bottom right corner.

The row will be marked for deletion, indicated by a red line, and will be removed permanently on saving the subject.


minusAssigning comment banks to a subject

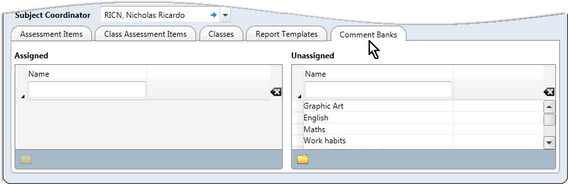
In Accelerus, school comment banks may be set up and assigned to subjects so that they are available to teachers of the subject when assessing their students.

In a subject record, the Comment Banks tab displays the comment banks that have been assigned to a particular subject.

It also allows comment banks to be assigned to the subject.

There are two methods of assigning comment banks and you would use one method over an other in the following circumstances:

If you need to add the comment bank to many subjects, you would open the comment bank and assign the subjects to the comment bank.
If multiple comment banks need to be assigned to a particular subject, you would do so via the subject's window, as covered here.


Comment banks may be assigned to subjects by those with a subject role when in the Accelerus database, as well as by Accelerus administrators and other school level roles with the appropriate permissions.

Because these users have different access to parts of Accelerus, the steps they follow vary a little.

If you are an Accelerus administrator, go to Explore and select Subjects, opening the subject from therein.

OR

If you have a subject role:
Click the subject you want to open from the Welcome Screen.
It opens in its results view from where you click its Open subject details icon, in the top right corner.
Click the Comment Banks tab of the subject window, displaying Assigned and Unassigned panes.

Com UnassignedCB

Assign the comment banks:
Enter search criteria in the search fields in the Unassigned pane to select particular comment banks.
Select the comment banks required, using the standard selection methods, eg Ctrl and Shift, or click the top left cell to select all.
Hold down your left mouse button over the selected comment banks, drag them to the Assigned pane and release your mouse button.

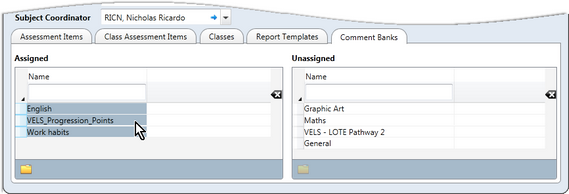
As shown here, three comment banks have been assigned to this subject, four remaining unassigned.

Com AssignedCB

The same drag and drop procedure may be followed to move comment banks from the Assigned back to the Unassigned pane.
Click the Save icon or press Ctrl S to save the assignment of the comment banks to the open subject.


Lightbulb

You may open any school comment bank from the Comment Banks tab of the subject window. Simply click on a comment bank, whether in the Assigned or Unassigned panes, and then click the appropriate Open Comment Bank icon.