Subject and Class Generator

Accelerus Icon
 

The Subject and Class Generator window, found under the Tools menu in Accelerus, allows you to create subjects and their classes, and enrol students into them in one process. Possible uses of the Subject and Class Generator include:

Enrolling all students into a single subject or pseudo subject, eg a home group subject or personal learning goals subject, with the classes of the subject being based on the home groups at the school, or the year levels.
Creating a single subject and class for use in the Goals Management system, eg for a Behaviour Scheme or for the Cover page.
Setting up a Primary school's subjects classes and enrolments. In this case, the students are usually taught in all of their subjects in their home groups, with most subjects being taught by their home group teacher. Only a few specialist subjects have a different teacher. Therefore, the Generator could create 1ENG, 2ENG, 3ENG, etc subjects, with classes 1ENG1A, 1ENG1B, 1ENG1C, etc. Students in 1A would be enrolled in 1ENG1A, those in 1B in 1ENG1B, etc.


Ent SubjGeneratorNumbers

You may run as many generation processes as required, noting the following:


#

Feature

1

The group of students selected will be the ones enrolled in the classes of the subjects being created. Their details will be used to determine what is created. For example, if you select Year 5 students, only year level 5 and the year 5 home groups will be able to be used for the mapping of students to subject levels and classes.

All of the current students are listed in the table and search criteria may be entered in the various student fields to select the students required. This works like all of the standard selection windows in Accelerus.

The highlighted students will be the ones enrolled and the number selected is displayed above the table. This table may be hidden, once you have made the student selections.

2

The Create subjects dropdown list determines the basis upon which subjects are created. It allows you to select:

A single subject if all of the selected students are to be added to one subject record for each subject area, eg ENG, MAT, SCI, etc. This does not mean you can only create one subject per generation process, but one record for each row in the Subject codes and name table.

This may be useful if all students are need to be in one subject, where what is assessed and reported is identical across all year levels or home groups, eg for a Home Group report.

A subject per year level, whereby the student’s year level will determine the subjects that are created and into which they will be enrolled. In this case, the year level is prefixed to base code of each subject in the Subject codes and name table, eg 3SCI, 4SCI, 5SCI, etc.
A subject per [cohort group], with the dropdown list reflecting the cohort groups set up in your Accelerus database, eg Home Group, Pastoral Care Group, etc. This option will create a subject for each home group or relevant cohort type set. The home group code will prefix the base code, eg 3ASCI, 3BSCI.

3

The Subject codes and names table allows you to enter as many rows as you require for the particular generation process, with a row being entered for each subject area you want to create. The two fields in the table are:

The code base for the subject, to which suffixes and prefixes will be added, based on other selections in the window. For example, if you enter ENG for English and want to have a subject for each year level, a 3ENG, 4ENG, 5ENG, etc will be created.
The name of each subject area, as you want it to appear on the report, eg English, Science, etc.

Individual rows entered in the table may be deleted, or the whole table cleared, using the buttons to the right of the table.

4

The subjects entered in the Subject codes and names table need to have a subject level assigned to them. The options in the Assign Subject Levels dropdown list allow you to:

Assign one of the actual subject levels found in your database, in which case all of the subjects being created will have this level, even if it does not match the student’s year level.
Map the subject levels to the year level of the students, eg a student in year 9 will be added to a subject with a level 9.

If you are using this option, it is important that your subject levels match your Year Level codes. For example, if you have a Year Level cohort code of P (for Prep) but your subject year level code is 0, Accelerus will not be able to match these.

5

The Create classes dropdown list is where you determine the breakdown of the classes to be created and which students will be enrolled in them. Here, you to select:

Single class, where all of the selected students are to be added to one class within each of the subjects being created. The class code will be identical to the subject code, in this case. A teacher will not be assigned to such classes.
A class per year level, where the student’s year level will determine the classes that are created and into which they are enrolled. The year level is appended to the end of the subject code, eg ENG3, SCI3, etc. Teachers holding a year level role will be assigned as teachers.
A class per [cohort group], with the dropdown list reflecting the cohort groups set up in your Accelerus database, eg Home Group, Pastoral Care Group, etc. This will create a class for each home group or other cohort type set up at your school, eg 3ENG3A, 3ENG3B. This option appends the student’s home group code to the end of the subject code, and assigns the home group teacher/s as the class teachers.

This is the most common selection used by primary schools, where the students study each of their subjects in their home group classes.

Warning

The assignment of teachers generated classes may not be exactly correct and you should note the following:

If you have created two home group roles, it is assumed you have two class roles, so that the home group teachers can be assigned as class teachers.
Likewise, if the classes are being created on the basis of year level, if there is no year level coordinator role, teachers will not be able to be assigned.
If the classes are being created on the basis of home group, the home group teacher/s are assigned as class teachers of all subject areas, including those that would be taken by different, specialist teachers.

Therefore, it may be necessary to manually change the teacher assignments in the classes that are generated, or do so via a CSV file.

6

Subjects must belong to an academic cycle and you select the academic cycle for the subjects being created. The only academic cycles able to be selected are those currently in force, according to the Academic Cycle Selector. These will be displayed in the top right corner of the Subject and Class Generator window.

If some subjects needing to be created belong to one academic cycle and other subjects to a different cycle, you need to run the generate process multiple times.

7

The Preprocess button compares the Generator’s instructions with the data already found in the database. The Preprocess pane lists all of the issues, errors and warnings under broad types or headings, eg subjects that will be created as they do not exist in the target cycle, classes that will be created with teachers assigned to class roles or, where teachers are not able to be assigned, where they will be created without teachers in the roles, and so forth.

Where records already exist, eg you are creating a 3ENG and a 4ENG and they already exist in the database, message will be displayed to this effect, as well as noting any changes that may be made.

To begin with, only the issue headings are displayed. You may double click a heading, or click the arrowhead to its left, to display the details of the records to which the issue applies. Double clicking again will hide the details.

8

In many cases, the details for an issue do not need to be revealed, eg 12 subjects are not in the database, as shown in the example above, if what you are expecting is that 12 subjects will be created.

However, in others it is important that all of the issues are read carefully and the individual lines to which the issue pertains are checked carefully. By revealing the details of an issue, you may investigate further and take steps to remedy any problems, if necessary.

If any issues are raised that you do not expect, eg subjects or classes that already exist or classes being added without teachers, etc, it is recommended that you do not proceed until you investigate these further.

For each issue type, there is a dropdown action box. A default action will be displayed, eg Add all new subjects. In most cases, alternative actions are available for selection from the dropdown list.

You may also change the action for an individual record, when the details are displayed. In this case, the heading's action will automatically change to Individually Specified.

9

When you have checked all of the issues and warnings listed after preprocessing and wish to generate the records listed, click the Proceed button.


minusHow codes and teachers are assigned

The Subject and Class Generator, in the process of creating the subjects and classes, automates the coding of the subjects and classes and the assignment of teachers, using the following protocols:

Subject and Class codes
The subject code will:
®Be the full code base of the subject if you select the Single subject option in the Create subjects dropdown, eg ENG.
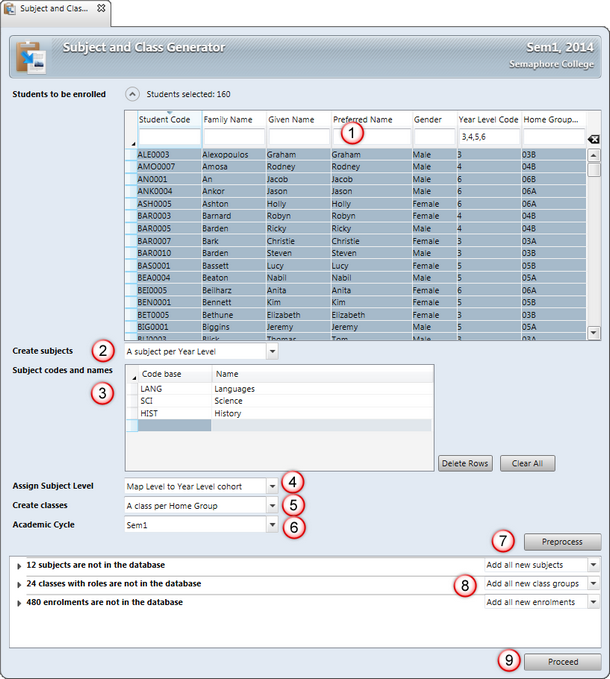
®Have a year level added to the front of the code base, based on the year levels of the students selected, where the option to create a subject per year level is selected. For example, if year 9 and 10 students are selected and the code bases are ENG and MAT, subjects will be created with the codes 9ENG, 10ENG, 9MAT, 10MAT.
®Where other cohort types that exist in your database, eg home groups, are selected in the Create subjects dropdown, as with the year level cohort, the group code will precede the base code, eg 9AENG, 9BENG, etc.
The class code will be:
®The same as the subject code, where the Single class option is selected in the Create classes dropdown list.
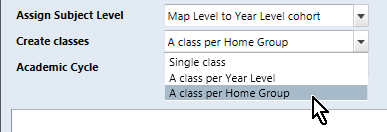
®Created by adding the appropriate cohort group code as a suffix to the subject code, where the option to create a class by year level or other cohort group is chosen. For example,  if English subjects are being created on the basis of year levels, the subject code will be 7ENG, 8ENG, etc. Then, if classes are being created, based on home groups, the class codes will be 7ENG7A, 7ENG8A, etc.
Subject levels and other information

The subjects that are created must be assigned a subject level. This will be:

The actual subject level you select, which will be assigned to all of the subjects being created, even if it does not match the year level of the student.
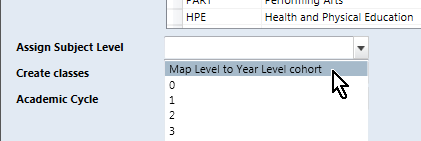
Mapped to the year levels of the students, if a matching year level can be found in the list of available subject levels, as found in your School Settings window. For example, if you have a year level cohort group coded 3 and a subject level of 3, a subject being created on the basis of year levels will have 3 as the subject level. Subjects will not be able to be created where the levels do not match, such as when 0 is used for your Prep or Reception subject level but the year level code is P or R.

Other fields in the subject records which are also not populated by the generation process are Subject description and report template slot. These can be updated later, manually or by importing a CSV file to update them in bulk, where they are used.

Teacher assignments
If you have subject roles defined in the Security window, you will need to manually add teachers to these roles when you create subjects in the Subject and Class Generator. No teachers are assigned to these roles.
In the case of classes that are generated, teachers will be added, where possible:
If creating the classes on the basis of a year level, where there is one year level coordinator role, this teacher will be assigned to the first of your class teacher roles.
Where classes are created for other cohort groups, eg for each home group, the teachers of the home groups will be added as teachers of the classes. This will be on a 'best fit' method, such as when you have Home Group Teacher 1 and Home Group Teacher 2 roles defined, as well as Class Teacher 1 and Class Teacher 2. However, if you have a different number of roles in the two types of records, or there is no obvious way of mapping these, you may end up with the wrong teachers or teachers missing in the newly-created classes.
If the classes are being created on the basis of home group, the home group teacher/s are assigned as class teachers of all subjects being generated, including those that would be taken by different, specialist teachers.

Therefore, it will be necessary to change these once the classes have been generated. You may do this manually, via the Class record, or you may update these in bulk by importing a CSV file of classes which has the correct teachers' codes.


minusSteps for a Primary school

The Subject and Class Generator is most useful for Primary schools where the school teaches a standard set of subjects in most year levels, students are taught in their home groups, with most subjects being taught by their home group teacher. The steps below cover the creation of subjects, classes and enrolments in this case.

In Accelerus, ensure you are in the correct academic cycles, as shown in the Academic Cycle Selector.
make sure your year levels and home groups have been setup, with the students being in their correct home group and the correct home group teachers assigned.
Check that your subject levels, as set in the School Settings window, are equivalent to the codes assigned to your year levels, as found in the Year Levels Explorer. If they are not, either change the year level codes or subject levels.
Go to to the Tools menu and select Subject and Class Generator.
In the table of students, select the all of the students in the school by pressing Ctrl A or or clicking the top left cell of the table of student records.

Ent SubjGeneratorSelectStudents

Optionally, hide the table of students by clicking the arrow button above the table, where the number of students selected is displayed.
From the Create Subjects dropdown list, select the option A subject per year level.

Ent SubjGeneratorSelectSubjPerYear

In the Subject codes and names table, enter a row for each of the subjects being taught to all students at the school:
In the Code base column, enter a short code for the subject, eg ENG, HPE, etc.
In the Name column, enter the full name of the subject, as you would like it to appear on the reports.

Ent SubjGeneratorSubjectCodeName 

Lightbulb

Usually a pseudo subject is required for the home group, in order that the home group teacher can write general comments, enter non-subject specific information, assess behaviour etc. If this applies to your school, do not forget to add a subject for this, eg HG - Home Group Report, as shown above.


If you have added any rows in error, you may highlight these, using the standard methods for selecting multiple rows (Ctrl and click or Shift and click), and then click the Delete Rows button.
From the Assign Subject Level dropdown list, select the Map Level to Year Level cohort option.

Ent SubjGeneratorSelectSubjLevel

Select A class per Home Group (or whatever the name assigned to your home group cohorts) from the Create Classes dropdown.

Ent SubjGeneratorCreateClasses

Select the Academic cycle into which the subjects are to be added. This will usually be either an annual cycle, eg 2014, or a semester if they are to be set up as separate subjects each semester.

Ent SubjGeneratorSelectAcademicCycle

If ready to proceed, click the Preprocess button.
In the preprocess pane, you should see three issue headers - one regarding adding the subjects, one for the classes and one for the enrolments.
The enrolments message should read "X classes with roles are not in the database." If it says without roles, you had not added your teachers to their home groups before starting and will need to do so before you proceed.
Carefully check all of the issues, errors and warnings that are reported and, where, an unexpected message is shown, click open the issue heading to check the details of the individual records.

Ent SubjGeneratorPreprocess

If there are unexpected issues:
®Keep the Subject and Class Generator open.
®Make any changes or corrections to the Accelerus records concerned.
®Return to the Subject and Class Generator and click the Preprocess button again.
®Ensure the messages are now correct and as expected.

Warning

Do not proceed unless you have fixed all errors and know exactly why different issues arose. If you proceed, you may waste a lot of time correcting errors manually.

Click the Proceed button to generate the subjects, classes and enrolments.
Repeat the generation process for any other subjects and classes you want to create, eg where only some year levels study the particular subject, making sure you select the correct subset of students.
Once you have completed generating all of the required subjects and classes, if some of the classes are taught by specialist teachers and not the home group teacher, either:
Go to the Class Explorer and open these classes, changing the teachers

OR

Export a CSV file of all of the classes, make the changes to the teacher assignments in the CSV file in Microsoft Excel and reimport the file via the Import CSV Files window.