Below are the steps to take to print student reports across the school via the Print Report Run window in Accelerus.
Reports may also be printed on a class-by-class basis by teachers when in their classes, either in their offline files or directly in the database, via File > Teacher Listings > Prepare Teacher Reports.
Complete explanations on the various sections and selections of the Print Report Run window may be found in Selections in the Print Report Run Window.
| • | It is recommended, if teachers are working in offline files, that you stop the Synchroniser running when you are ready to commence your actual print run. |
OR
| • | Stop teachers from being able to modify results if they are working directly in the database using Accelerus or Accelerus Web, eg remove the Modify results permission from the various subject, class and cohort roles via Tools > Security. |
| • | If using calculations, run a calculation process for the currently selected cycles via Tools > Calculate All. |
| • | Victorian Government and Catholic schools preparing to print AusVELS reports should calculate the overall domain results via the Quick Setup window. |
| • | Test print several individual reports to check all the formatting is as expected before printing a large number of reports. |
|
| • | Select File > Print Report Run and select the report run you wish to print. |
OR
| ➢ | Go to and open the Report Run branch. |
| ➢ | Right click the required report run and select Print 1 report run. |
|
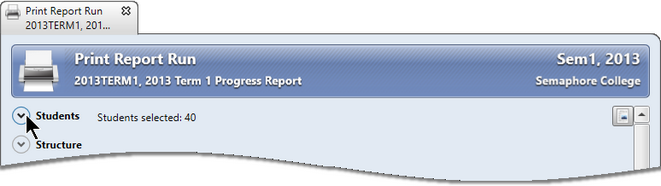
In the Students section of the Print Report Run window:
| • | Enter selection criteria to bring up the students you wish to print, using the standard search protocols found in all Explorer windows. |
For example, enter a year level to print the reports of students in that year, as seen below.

| • | Select the required students: |
| ➢ | Click the top left cell to select all students who meet the selection criteria. |
OR
| ➢ | Hold down the Ctrl key while clicking individual students. |
OR
| ➢ | Select the first student required and, holding down the Shift key, click the last student, to select a contiguous group of students. |
| • | Hide the Students section by clicking its hide/show arrow, but the number of students selected will still be visible. |
|
| • | To view the portions, slots and templates that will be printed for the selected students, click the hide/show icon for the Structure section. |
| • | If you want to exclude any portions or subjects selected by default: |
| ➢ | Deselect the checkbox for each portion to be excluded totally. |
| ➢ | Contract or expand portions in the Structure box to list the individual subjects. |
| ➢ | Deselect the boxes for the subjects you wish to exclude, if you do not require all subjects. |
Note that if only a few subjects are required, it is easier to deselect the whole portion and then reselect the required subjects.

|
| • | If you want to restrict the reports listed in the Structure section to those relating to particular teachers, subjects or classes, click open the Filter section. |
| • | Tick the filter option required, eg By Teacher. |
| • | Enter the code of the teacher, subject or class you require, as appropriate. Where you require multiple records, enter their codes separated by commas. |
OR
| • | Click the Browse button at the end of the Code field to bring up a selection window in which you find and select the particular teachers, subjects or classes. |
| • | In the case of filtering by teacher, from the Role dropdown list, select the role of the teachers that you are interested in from the list of available roles. For example, you may want to print the reports for classes taught by a particular teacher. |
| • | Select the action required, eg to exclude or include all, portions or templates of the students’ reports for the selected teachers, subjects or classes. |

| • | Make similar selections for any other filters required, where more than one. For example, you may select certain teachers and a particular subject. This will mean your selections will be filtered even further. |
|
| • | Click the Blank results listing option to search all selected templates for missing results and produce a listing that may be previewed and printed. |
OR
| • | Select Print reports which will allow you to further refine your print run via a series of options. |

|
| • | In the Options section, in most cases you should check the Exclude withdrawn enrolments box. |
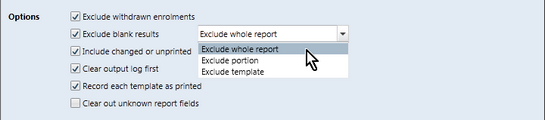
| • | Select the required combination of the next four boxes, to: |
| ➢ | Exclude reports of students missing results, and the extent of the report to be excluded from the dropdown list for this option. |
| ➢ | Only include reports that have changed since the last recorded print or which have not yet been printed. For this option, select which part of the report you wish to be printed. |
| ➢ | Clear the record stored in the database of reports that have been printed for the selected students and subjects. |
| ➢ | Keep a record in the database of the date and time each subject template was printed for the student. |
| • | Check the Clear out unknown report fields box if you do not want autotext errors to appear where fields cannot be found. |
|
| • | In the first Sort By field, click the dropdown box to choose your primary sort mode, ie the order in which you want the reports to be output. |
| • | If required, select the second and third sort orders. For example, as shown below, the reports will be grouped by Home Group and then, within each home group, by the student’s family name and given name. |
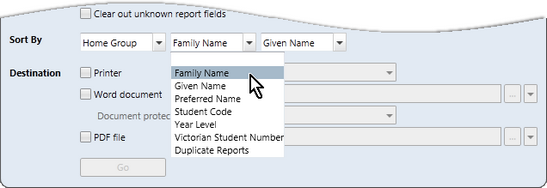
Note that if no selections are made, the reports will print randomly.
|
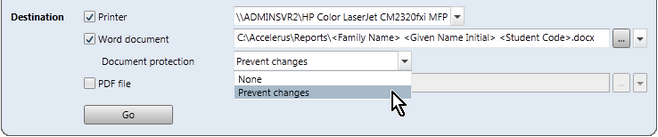
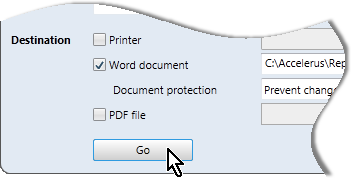
| • | Decide on the output method/s for the reports, ie if the reports are to be output to a printer, a Microsoft Word document or PDF file, selecting multiple checkboxes if required. |
| • | If you check the Printer option, select the printer from the dropdown list of available printers. |
| • | If the destination is to be a Word document: |
| ➢ | Click the Browse button at the end of the field to select the base folder. |
| ➢ | Click the arrow beside the Browse button to bring up a list of fields that you may include in the path and file name, with backslashes (\) entered in appropriate places. |
Below, the reports will be output to C:\Accelerus\Reports, and each file is to be labelled with the student's family name, given name and student code, eg Smith J SMI007.docx.
| ➢ | Select Prevent Changes, unless for some special reason you want to be able to change the output reports, which is not recommended. |
| • | If your version of Microsoft Word allows the saving of files into .pdf format: |
| ➢ | Tick the PDF file option to output to a PDF file, if required. |
| ➢ | As with the Word document option, click the Browse button to select the file path and add fields to the path and name by clicking and selecting from the dropdown list. |
|
| • | Click the Go button when ready to proceed, and a progress box will be displayed, with a completion box appearing at the end of the report processing. |
| • | If printing reports to Word documents or pdf files, in the completion message box, you may click the hyperlinks therein to take you to one of the following: |
| ➢ | Directly to the output report, if only printing one student report, opening it in the appropriate one of Word or Acrobat Reader, or whatever the default pdf reader is on your computer. |
| ➢ | Where multiple reports are being printed, to Windows Explorer which will be open at the root folder. |
For example, if the reports are to print to C:\Accelerus\Reports\<Home Group>\<Student Code>.pdf, the Reports folder in C:\Accelerus will be displayed in Windows Explorer.
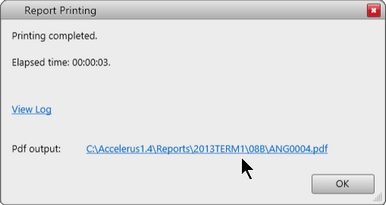
| • | You may also view the log of the print run by clicking the View log link in this message box. The log will contain information, warnings and errors resulting from the print run, and should be checked if any errors or warnings are contained in the message box. |
| • | Click OK to close the completion message box. |
|