Selections in the Print Report Run Window

Accelerus Icon
 

Several of the sections in the Print Report Run window allow quite complex selections of reports, the procedures and full explanations thereof being detailed below.

minusSelections in the Students table

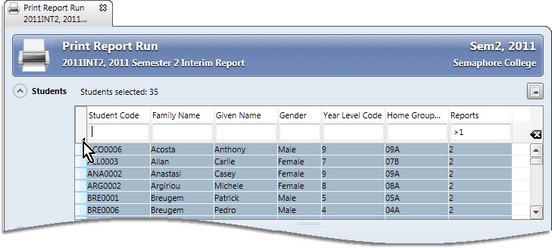
In the Students table you may select to print the reports of an individual student through to every student in the school, or subsets thereof.

This table functions like most selection windows in Accelerus whereby search criteria may be entered and multiple-selection procedures used to select the students.

This window also allows students to be selected on the basis of student custom properties that have been set up. For example, if you have set up a custom property that identifies those students requiring multiple reports, this may be used to select the students for a second report run. As seen below, >1 has been entered in the Reports column, a custom property field, to select all students where more than one report is required.

You may also open the record of any student from this table, by double clicking the student's row.

SRP Step27

The Students table may be resized as well as hidden, once you have made your selections, with the count of students selected being displayed even when hidden.


minusSelections in the Structure pane

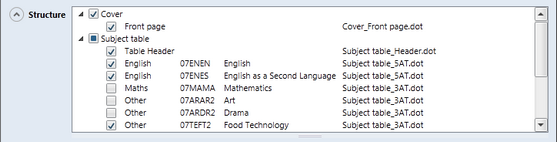
The Structure pane, when revealed, displays the portions and subjects that apply to the students selected, ie it informs you of the potential reports that will print for the selected students. From here, individual portions and subjects may be excluded by deselecting the appropriate boxes.

The portions are displayed in the order that they will print, as are the slots and the subjects within them.

SRP Step28

It is very useful if you want to:

Check on the reports that would print for a single student. By selecting the student and revealing the Structure pane, you will see exactly which reports will print and the order in which they will print.
Print just one portion, whereby you may deselect all other portions in the pane.
Print just a particular slot or slots, eg all subjects that are in the English slot. In this case, you would deselect the portion and then reselect just the subjects in the English slot.
Print any combination of reports, eg if several reports need reprinting for some reason.


minusFiltering reports

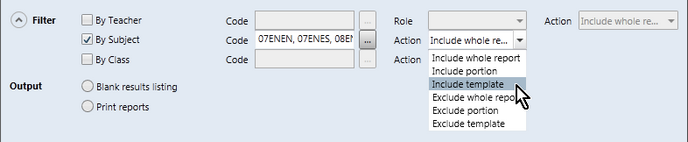
You may filter the reports to be printed further using any or a combination of the filters found in the Filter section.

Filtering may be done using teacher, subject or class criteria. You may select multiple records and apply multiple filters at the same time.

Some of the uses for the filter fields include:

Printing out all of the reports for a particular teacher, eg for proof-reading purposes.
Reprint all of the reports for a particular subject, eg if a change has been made across the board to the template applying to the subject.
Excluding the reports of any students taught by a particular teacher, eg if the teacher has been away and has not been able to finish their students' reports, as shown below for teachers DUNL and FURS. In many cases, you would want to exclude the whole of the student's report, not just the template for the particular subject taught by the teacher. This is what has been selected below.

SRP Step29

There are three parts to this filter:

In the Code field you may enter the code of the teacher, subject or class you require or click the Browse button and select the particular records. You may select multiple records, each separated by a comma.
In the case of the By Teacher option, from the Role dropdown list you may select the role of the teacher that you are interested in. It will list all of the subject, class and cohort roles that are applicable to the selections in the Structure section. For example, you may want to print the reports where a particular teacher is a class teacher or is a subject coordinator.
The Action dropdown lists a series of options relating to the printing of the selected record’s reports. For example, you may print the whole report or just a template or choose to exclude various sections of the report.

In the above example, any student whose report includes subjects taught by the teachers selected will be excluded from the print run.

In the example below, only the selected English subject report templates will be printed if Include template is chosen.

SRP Step29B


minusProducing a Blank Result listing

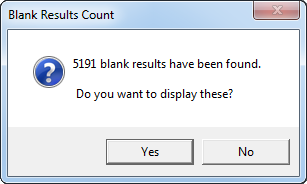
The Output section contains an option Blank results listing, which should be chosen prior to printing student reports. It brings up a count of the number of blank results found, to begin with.

SRP BlankResultNumberMessage

You may choose to preview the report of blank results and, from the preview window, print all or selected pages.

It should be run for all students who should be receiving a report in the report run, eg all students in the school or, if there are different print dates for different subschools, say, then for the subschool.

The blank results listing prints on a teacher by teacher basis, with a page break after each teacher, so that every teacher can receive just their pages.

It shows, in each class, where results are missing from the reports selected for printing, the exact student and assessment items missing.

SRP Step30


minusControlling the output of reports

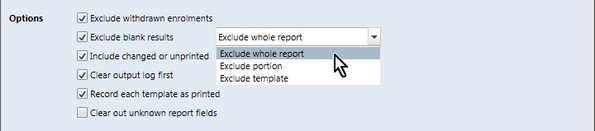
The Options section includes several checkboxes to control what is or is not output. Several of the checkboxes must be used in conjunction with each other to keep track of reports that have or haven't been printed.

SRP Step31


The options and their usage is covered below:


Option

What it does

Exclude withdrawn enrolments

This option is available for both the Blank results listing and Print reports outputs and it is usual to have this option checked except for special cases.

When checked, it excludes from the listing or printed reports any classes where the student has been withdrawn. If, for some reason, you need to print the reports for withdrawn enrolments, eg a student wants a copy of their report on leaving the school, you may deselect this checkbox.

Exclude blank results

If printing reports, you may optionally check this box to exclude parts or all of the report if there are results missing.

When this option is checked, a dropdown list allows you to select how much of the report of the student is to be excluded. Choose:

Exclude whole report to exclude the whole report for any student who has a missing result in any part of the report.
Exclude portion to exclude only the portion containing the blank result.
Exclude template to exclude only the subject template containing the missing result.

Include changed or unprinted

This option is used for reprints of reports where any results included on the reports have changed since last printed, or for reports that have not yet been recorded as having been printed. It will only work where you have previously had the Record each template as output option selected - see below.

If this option is checked a dropdown list allows you to select which part of the report you wish to be printed:

Reprint whole report to reprint the entire report if any result has changed.
Reprint portion to reprint the portion containing the changed results, most useful for part-page reports.
Reprint template to reprint the subject template containing the changed result, generally used only for reports where each subject is on a page of its own.

Clear output log first

If you wish to clear the record stored in the database of reports that have been printed for the selected students and subjects, check the Clear output log first checkbox.

This should only be selected in the first run of reports for the particular students. For example, you may commence printing in earnest, starting with the selection of Year 7 students. You would select the Record each template as printed box - see below - and the Clear output log first box. Any previous records of the Year 7 students' reports having been printed will be cleared first and Accelerus will then record those that are then output successfully.

Record each template as printed

Select this box to record the date and time when each subject template was last printed for the student.

It is recommended this is ticked when printing full reports, but unticked for test reports.

It must be used consistently and correctly in order for many of the other checkboxes to work. For example, the Include changed or unprinted option assumes that your database already contains a record of which templates have been printed, via the selection of this checkbox.

Clear out unknown report fields

This option is only used in very special circumstances, where schools have subjects with different numbers of assessment items sharing templates. Normally, if an assessment item that has been inserted in a template does not exist in a particular subject, when a report for the subject prints an autotext error appears. Checking the Clear out unknown report fields will stop the autotext errors from appearing where fields cannot be found.

Note, however, that legitimate errors in templates may be missed when this option is used, as it will ignore all autotext errors.


minusSelecting the output location for docs and PDFs

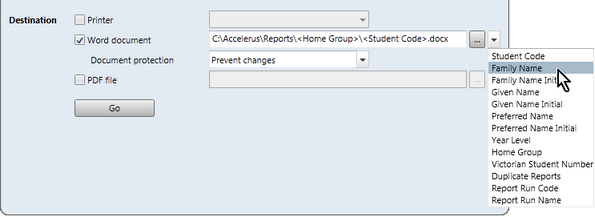
Student reports may be output to either a Microsoft Word document or an Acrobat PDF file, one file per student's report, in addition to being sent to a printer.

Note that the PDF file option may only be used if Word is set up to allow documents to be saved to PDF.

SRP Step32

In the case of both the Word document and PDF file options, you determine the location in which the output reports are to be stored and the name that is assigned to each report. For example, you may want to output all of the reports into a folder for each home room, or each year level, or even a folder for each student.

In fact, you may run the print process multiple times, selecting a different location each time, eg one run that puts all of the reports into home group folder and one that outputs the reports into each student's personal folder. In this way, you can have a central and historical record of every student's report in one location, as well as a copy in the correct home room folder for the year.

You must select a base folder for the reports, but Accelerus will create sub-folders, eg for each home group or year level, in the process of printing the reports, based on what is entered in the destination field for both options, if the folders do not already exist.

To set up the location and name of the Word or PDF files:

Click the Word document or PDF file checkbox.
Click the Browse button at the end of the field to select base folder path.
Click the arrow beside the Browse button to bring up a list of fields that you may include in the path and file name, with backslashes (\) entered in appropriate places.

In the example shown above, the reports are to print to the folder C:\Accelerus\Reports, with a folder being created for each home group, and the actual student report having the student code for the file name, ie C:\Accelerus\Reports\<Home Group>\<Student Code>.docx.

In the case of the Word document option, select either Prevent Changes or None from the Document protection dropdown list if you want to prevent any changes being made to the output Word document reports, or to make them fully editable, respectively.

It is highly recommended that Prevent Changes is selected.