Offline files may be:
| • | Collected by teachers via the Accelerus Login window when the teacher is connected to the network and their computer can talk to the Accelerus Synchroniser program. |
OR
| • | Downloaded by a teacher from the Welcome Screen when working directly in the Accelerus database. |
OR
| • | Exported out of the Accelerus database by the Accelerus administrator. |
|
Where a school has chosen the Active Directory login option in the System Items tab of the School Settings window that limits the authentication of teacher logins exclusively to Windows, it is not possible for teachers to collect their offline files via the Accelerus login window, ie the first option above. Therefore, the offline files must be attained using one of the other two methods, and it is most likely the Accelerus administrator will export the offline files out of the database. |
The export method may be preferred by some schools because it has some special features:
| • | The ability to export all of the files in the one process and have the system create folders for each teacher in specified locations, with a series of variables being available for naming conventions. |
| • | Additional options such as clearing out any existing offline files in the specified location. |
| • | You may nominate the Synchroniser IP address and port number in the Synchroniser section of the School Settings window. These settings will be stored in the exported .aof file, making it unnecessary for teachers to enter them manually. |
Steps to export offline files
When in the Accelerus database as an administrator:
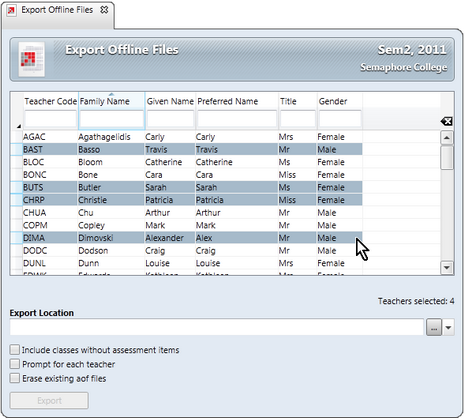
| • | Select File > Export > Offline files, bringing up the Export Offline Files window. |
|
The Export Offline Files window only displays teachers:
To display teachers and their classes without any assessment items, click the Include classes with assessment items checkbox. |
| • | Make your selection of teachers, using the standard selection procedures, eg enter selection criteria, use Ctrl and Shift to make multiple selections, etc. |
| • | In the bottom section of the window, stipulate the Export location by: |
| ➢ | Clicking the Browse button at the end of the location field and selecting the required location, eg C:\Accelerus\Offline Files. |
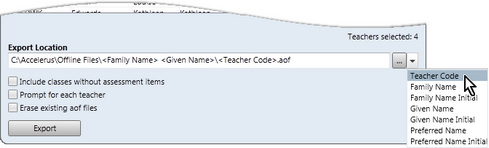
| ➢ | Clicking the dropdown arrow to the right of the location field to select any placeholders that you want to include in the location, ensuring that you have included any backslashes required to have a valid location. |
In the example below, an offline file will be created for each teacher code in their own folder which will be labelled with their Family and Given Name, within the folder C:\Accelerus\Offline Files.
| • | Below the Export location are a set of checkboxes that you select, as required: |
| ➢ | To include classes where there are no assessment items, or exclude these. |
NB If you check this box after you have selected the teachers, additional teachers may become available in the table above, ie those where all of their classes are missing assessment items.
| ➢ | Whether you are to be prompted for each teacher. |
This is usually used when exporting the offline files to USB memory sticks.
If this is ticked, once you begin the export process, a directory window appears as each teacher is stepped through. In this you must select the location and name of the offline file for each teacher individually.
| ➢ | Whether to erase any .aof files found in the location before exporting the new files. |
| • | Click the Export button to export the offline files for the selected teachers. |