To add a new comment bank, whether a school or teacher one, follow the steps below, although to begin with these may vary, depending on the method you wish to use and your role:
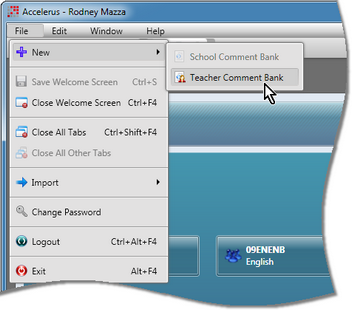
| • | From the File menu choose New and then either School or Teacher Comment Bank. |
Note that the School Comment Bank option will be disabled if you do not have privileges to create school comment banks.
OR
| • | Bring up the Comment Bank Explorer: |
| ➢ | If you are an Accelerus administrator, go to the Explore menu and select Comment Banks. |
OR
| ➢ | From the Welcome Screen, for all users, click the Comment Bank Explorer icon. |

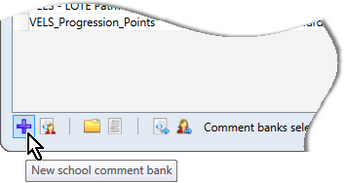
| ➢ | In the Explorer, click the new school or teacher comment bank icon, as appropriate. |
The first icon adds a new school comment bank and the second, next to it, a teacher one.
| ➢ | Double click where blank comment bank name is displayed in the top left pane. |
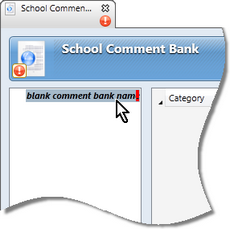
| ➢ | Type in the name of the comment bank. |
| ➢ | Click the Save icon or press Ctrl S to save the comment bank. |
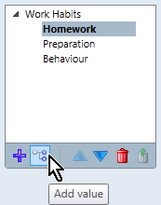
| ➢ | Keep the comment bank name highlighted and click the Add category icon below the top left-hand pane. |
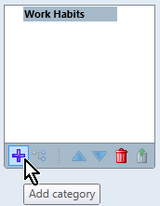
| ➢ | In the blank field that appears, enter the category name. |

| ➢ | Add further categories by clicking the Add category icon. |
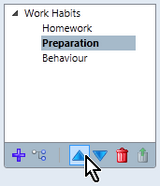
| ➢ | Move the categories that have been added into the correct order, if necessary, by clicking the Move up and Move down icons. |
| • | Create values for each category: |
| ➢ | Click the category to which you want to add values and then click the Add value icon. |
| ➢ | Enter the name of the value in the blank field below the selected category. |
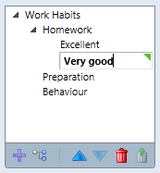
In the example shown above, the Work Habits bank has a category called Homework which has two values, so far – Excellent and Very Good. There are also Preparation and Behaviour categories without any values as yet.
| ➢ | Continue adding values, as required. |
| ➢ | If necessary, move any values into the correct order, by clicking Move up and Move down. |
| • | Compose comments for category values: |
| ➢ | With the value belonging to a category highlighted, click the New comment icon. |

Above, a comment will be added for the value Excellent for the category Homework.
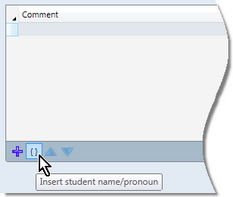
| ➢ | Type in the comment required in the Comment cell. |
| ➢ | In the locations where the student’s name or appropriate pronoun should appear, click the Insert student name/pronoun icon. |
| ➢ | In the Name/Pronoun Substitution box which appears as shown here: |
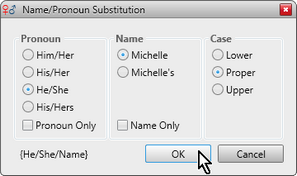
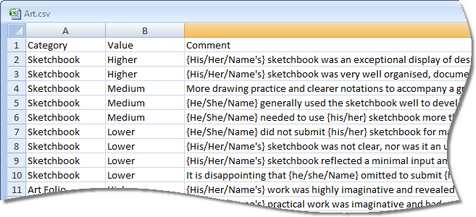
| ® | Select the required pronoun and name option buttons required, with an example of the substitution text appearing in the bottom left corner, eg {He/She/Name} |
| ® | Click the Pronoun Only or Name Only checkboxes, where you want to limit the substitution, eg {he/she} or {Name}. |
| ® | Select the correct case option, eg lower case {he/she} where it is to appear in the middle of a sentence. |
| ® | Click the OK button to insert the selected substitution text in the comment. |
OR
| ➢ | You may manually enter the required substitution text: |
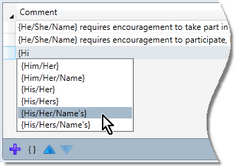
| ® | Type the open brace icon, ie {. |
| ® | This will bring up a dropdown list of available options from which you may choose the correct substitution, eg {His/Her/Name’s}. |
| ® | Type as much of the substitution text as you wish and, as you do so, the dropdown list will only reflect the options that match. |
| ➢ | Continue adding comments, as required. |
| • | Click the Save icon or press Ctrl S to save your comment bank. |
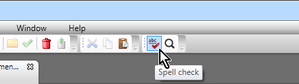
| ➢ | Click the comment bank name in the left category/value pane. |
| ➢ | Click the Spell check icon in the toolbar or press F7 to start the spell check operation. |
| ➢ | Work through any errors brought up in the Spelling and Punctuation window, choosing to ignore errors, add the spelling to the dictionary, select from suggestions or enter replacement text, as appropriate. |

|
By clicking the comment bank name, all comments in the comment bank will be checked.
However, if you click on a category, only that category will be checked for spelling and punctuation errors. Likewise, if you click a particular value, only the comments for that value will be checked.
|
| • | Print out the comment bank: |
| ➢ | If you require a printed listing of the comment bank, go to the Comment Bank menu and select Comment Bank Listing. |
| ➢ | Preview the listing, moving through its pages and performing other preview processes required. |
| ➢ | Click the Print icon in the preview window and make your print selections, as required. |
|